
Unit builder
Assemble a Recoil or Spring unit out of pre-textured parts, animate it from a preset, and write it into a game. No modelling, no UV work: every part in a pack shares one texture, so anything you build from them is already mapped.
The builder is a modding tool, so it is hidden until you turn on Advanced mode in Settings > General. It then appears in the sidebar as unit builder, with Models for what you have built and Lego Parts for what you can build from.
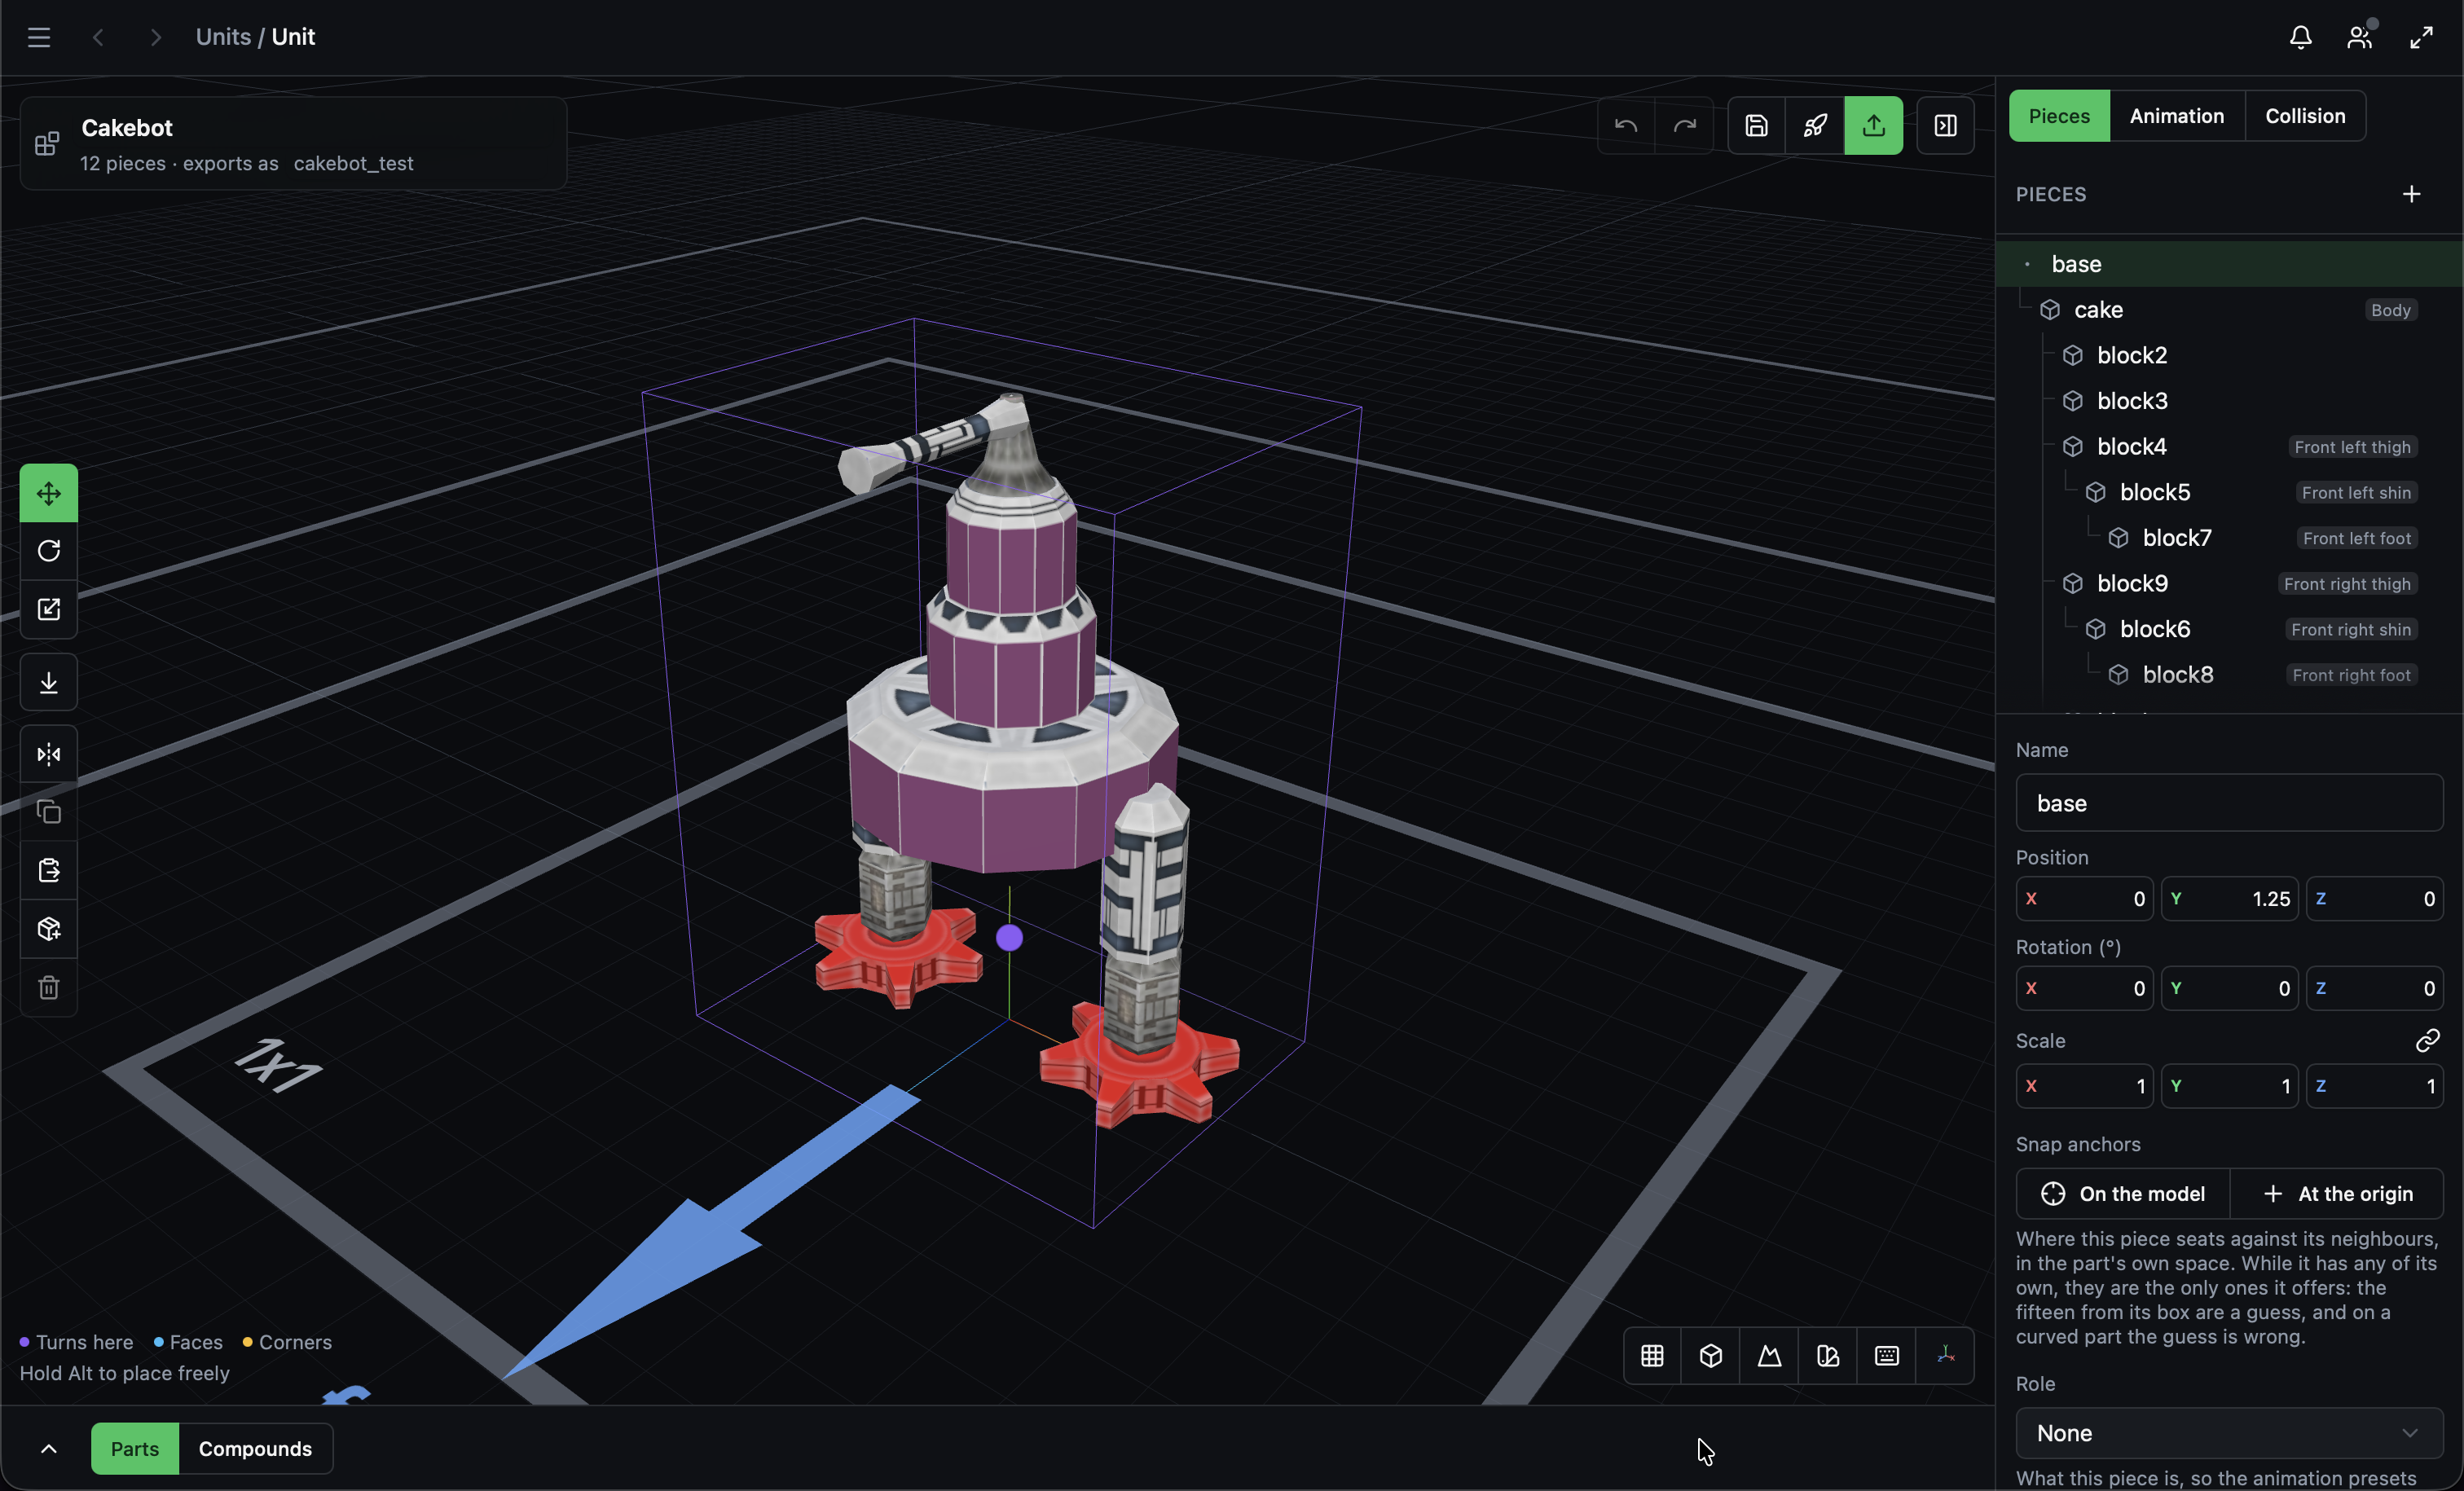
Three things to know before you spend an evening on this:
- A unit you export is on no builder's menu, so nothing in the game can build it until you add it in the workshop. See making the game use the unit.
- A unit built from parts does not belong to a game yet, so the builder has no movement classes to offer it and exports it static. A unit opened from a game can be given one. See movement.
- The engine draws a built unit much paler than the builder does. Nobody knows why yet (issue #4175).
Build a unit
Go to Units and press New unit. Blank gives you an empty unit with one piece, base, which is the root everything else hangs off. A body plan, such as Two legs or Wheels, gives you a unit whose bones are already placed and moving. See Start from a skeleton.
Name it. The name at the top left is what the unit is called in the overview. Under it is the export name, which is the base name of every file the export writes, and a Lua identifier, so it is lower case with underscores. It follows the title until you set it to something of its own.
Add parts. The Inventory tab of the strip along the bottom holds the parts and modules. Search it, narrow it by colourway, and click a part to add it. With a part selected in the unit, the new part is joined to a free face of it, in this order: top, front, back, left, right, bottom. The selected piece stays selected, so clicking more parts fills its other faces. Once every face has a part joined to it, the next goes on the face with the fewest. Collapse the strip with the chevron when you are done reaching for parts.
Place a part on a face. With nothing selected, or with a piece that has no faces such as base or a flare, clicking a part in the strip starts placing it. Hover a face of any part and a translucent copy shows where it will go. Click to add it there, joined to that face. While placing, N joins it by its next face and T turns it a quarter turn about the face. Escape, or clicking the same part in the strip again, stops. In a unit with no parts yet there is no face to hover, so click anywhere in the view to add the first part at the origin.
Move it. Drag the gizmo in the 3D view, or type numbers into the selected piece's Position, Rotation and Scale fields. G, R and S switch the gizmo between move, turn and scale. A move drag works differently for a joined part and a free one:
- A joined part slides along the face it is joined to and stays joined. It moves in steps of the part unit, counted from where it rests.
- A free part moves in steps of the part unit, measured on its parent's axes, so the Position fields read round numbers. It snaps to the corners, face centres and middles of nearby pieces. Snap one of its faces onto a face that points back at it and the two are joined, and the part now hangs off the piece it joined.
- Hold
Altwhile you drag to place a part freely, with no step and no snap. A joined part dragged withAltis detached and stays where you drop it.
The part unit is set by the pack, and is 0.25 for the bundled one. See part unit. Turning steps by 15 degrees, and Alt turns that off too. A part from an imported model has no move step. The view names what a drag has snapped to, or the step it is moving in, while you do it.
Resize a part. Press S with one pack part selected and a plate appears on each face of its box, in place of the scale gizmo. Drag a plate and the part is swapped for the pack part of that size, in the same colourway, shape and material, as one undo step. A part is a fixed mesh, so the drag snaps to the nearest size the pack has with the same other two sides. The readout gives the size in elmos and part units, and says when it snapped. When the pack has nothing longer, nothing shorter or no other size on that axis, it says that instead. Many parts in the bundled pack have no other size along some axis. See sizes in the bundled pack. Alt does nothing here. The uniform scale lock keeps the scale gizmo, which stretches the part instead.
The opposite face stays where it is, unless the part is joined, in which case it stays on its join. Parts joined to it follow their connectors, and other pieces hanging off it stay where they are. A generated shape resizes the same way, without the swap.
Say what each piece is. With a piece selected, the panel on the right sets:
- Name. Lower case and unique, because a unit script addresses pieces by name.
- Hangs off. Which piece carries it. Dragging a row onto another in the tree does the same thing. Changing it detaches a joined part, which stays where it is.
- Turns about. Where the piece's origin sits inside its part: middle, top, bottom, left, right, front or back. This is the point the piece turns about and the point its children hang from. A leg wants its top, not its middle.
- Role. What the piece is, so the animation presets know what to move.
Add empty pieces with the + above the piece tree. An empty piece has no geometry. It carries other pieces, and it is how flares, aim points and emit points are made. Empty pieces are real pieces in the exported model, not an editor convenience.
Hide a piece with the eye button on its row in the tree, to get it out of the way while you work on what is behind it. Hiding is editor-only: a hidden piece is still exported.
Sit the unit on the ground with the arrow button in the left-hand toolbar, which drops the whole unit so its lowest point is at ground level.
Everything saves itself shortly after your last edit. The Save button forces it, and the label beside it says whether there is anything outstanding.
Keyboard shortcuts
Press ? for the full sheet, or the keyboard button in the bottom right of the view. It is generated from the same table the handlers dispatch through, so it cannot fall out of step with what the keys actually do.
The ones worth learning first are G, R and S for the three gizmo modes, F to frame the selected piece, and Alt held down to place a piece freely.
The piece actions
The buttons down the left of the 3D view act on the selected piece: duplicate, paste, save as a module, delete. They are in the view rather than the sidebar because that is where the piece is.
Copy and paste go through the system clipboard, so they cross windows. Copy a leg in one unit, paste it into another. Anything on the clipboard that is not a piece is rejected with a reason. A pasted piece whose part is not in any installed pack still pastes: the names, the hierarchy and the transforms are real work, so they are kept and the missing geometry is reported rather than dropped.
Joins
A join holds a part to a face of the piece it hangs off. Move, turn or resize that piece and the part stays on its face.
A part is joined when you add it from the strip with a part selected, place it on a face, or drag one of its faces onto a face that points back at it. Units built before joins existed open unchanged, with every part free, until you do one of those.
Every part has six faces, named for the unit's directions: top, bottom, front, back, left and right, as in Which way it faces. A pack can state a part's connectors instead, and those keep the names the pack gives them. See connectors in the pack guide. Connectors in the piece panel gives one piece connectors of its own, clicked onto the model or added at its origin, each with a facing and an up direction. A piece with its own connectors joins only through those, not through its part's faces. A generated shape has connectors of its own, as Connectors on a shape describes.
See a join. A joined piece has a link mark on its row in the piece tree, and hovering the mark names both faces. With the piece selected, the view outlines the face it is joined by and the face it is joined to. Show free faces, in the piece panel, outlines the rest of its faces too. The outlines are drawn only in the builder and are never exported.
Joined to, in the piece panel, names the piece and face it is joined to and the face it is joined by, or reads Free. Along and Up move the part across the face, and Twist turns it about the face, in degrees.
Detach frees the part where it is. Changing Hangs off, turning the part, typing a new position or rotation, and dragging it with Alt all do the same. Changing its scale keeps the join.
Scaling. A joined part keeps its own size when the piece it is joined to is scaled, and stays on the scaled face. A free part still scales with the piece it hangs off. A joined part is not mirrored when the piece it is joined to is.
Change part, in the piece panel, swaps a piece's part for another shape or colour without rebuilding what hangs off it. The drawer has the parts search and filters, with the current shape's other colourways first. Joins carry across. A join keeps its face when the new part has a face of the same name, or moves to the face that points the same way. Parts joined to the piece follow the new part's faces. Turns about keeps its setting, and any of the piece's own connectors that fall outside the new part are removed and named under the button.
Broken joins. A join that names a face its part no longer has is broken, which a part swap can cause. The piece stays where it was, Joined to reads Broken in red, its tree mark is red, and the problem is listed above the viewport. Detach it, or drag it onto a face again.
Copies. Duplicate keeps the original's join. Mirroring a part, in place or as a copy, joins the copy to the face where its reflection sits, and so does a twin made in symmetry mode. When no face is there, the copy is free. A twin follows its partner: slide the partner along its face and the twin stays joined, drag the partner free and the twin goes free too. A pasted part lands free, keeping the joins inside what you copied.
Symmetry round the axis. The symmetry options next to the button switch a new piece from one mirrored twin to a ring of copies round the vertical axis of the root piece, from 2 to 12 of them. Place a leg and the others follow it at equal angles. Each copy keeps the original's role and is a module instance of its own, so a ring of legs is not a walker by itself. A piece on the axis waits until it is moved off it. Change the count and the selected ring gains or loses copies in one undo step. Break in the piece panel lets the ring go and leaves the pieces where they are.
Generated shapes
A generated shape is a piece coilbox makes from a kind and a few numbers, rather than a part from the pack. It takes any size you type, so it gives you wheels, barrels, pipes and sloped noses at sizes the pack does not have.
The kinds
There are six. Each has its numbers in the piece panel, in elmos.
| Kind | Numbers |
|---|---|
| Cylinder | Axis, Radius, Length, Sides |
| Tube | Axis, Radius, Length, Wall, Sides |
| Cone | Axis, Bottom radius, Top radius, Height, Sides |
| Sphere | Whole, Dome or Bowl, Radius X, Radius Y, Radius Z, Rings, Sides |
| Dome | A sphere set to Dome, so Radius Y reads Height |
| Wedge | High at back or High at front, Width, Depth, Height, Low end |
- Sides start at 12 and rings at 4. Fewer of either makes a lighter mesh.
- A cone with a top radius of 0 comes to a point, and one above 0 is a cut cone. A top as wide as the bottom is refused, with a line saying to add a cylinder.
- A tube keeps its wall when its radius changes, and the wall must stay below the radius.
- A sphere's three radii can differ, so it can be an oval. Bowl keeps the lower half.
- A wedge slopes from its full height at one end to Low end at the other. A low end of 0 is a pure wedge, and one equal to the height is a box.
A number the shape cannot take is refused with a line saying why, and the shape keeps what it had.
Add a shape
Shapes are listed first in the inventory, before the pack's parts. Shapes among the category buttons lists them alone, and choosing a colourway hides them, since a shape has no panel of its own. The search matches a shape's name and its tags, so "round" finds the cylinder, tube, cone, sphere and dome, "pipe" finds the tube and "ramp" finds the wedge. Shapes go into Recent and Favourites like parts.
Click a shape to add it at its default size. It hangs off the selected piece, or the root when nothing is selected, at that piece's origin, and is selected. It does not join a face or lie along a bone the way a part does, so move it into place afterwards.
The Lego Parts page shows a shape's kind, size, numbers and tags beside a preview you can turn.
A pack with no swatches offers no shapes.
Wheels
There is no Wheel entry among the shapes. Use a cylinder, a tube or a cone. When one has the Wheel role, or hangs anywhere under a piece that has it, coilbox turns it so its axle lies along x, which is the axis Wheels turning spins about. Its origin moves onto the axle without moving the shape. The same happens when you add one there, give a piece the Wheel role, or change its Axis. The bones of the Wheels and Tracks body plans carry the role, so a cylinder added to a wheel bone spins straight away.
If a wheel is later turned by hand so its axle is off x, the problems list warns under Skeleton, as in "lwheel1" turns about x but "cylinder" has its axle along y. A sphere is not turned, because it has no axle.
The built in Wheel module is a pack part, not a shape.
Resize a shape
Press S with one shape selected and a plate appears on each face of its box, in place of the scale gizmo. Drag a plate to resize the shape. It steps by the pack's part unit, 0.25 elmo on the bundled pack, and the readout gives the size in elmos and units. Hold Alt to resize freely, down to 0.05 elmo.
- Dragging a round side sets the radius, so both sides across the axis change.
- A tube's radius stays above its wall, a cone's bottom radius above its top radius, and a wedge's height at or above its low end.
- The opposite face stays where it is, as when resizing a part. A joined shape stays on its join.
- A symmetry twin follows, and a wheel stays on its axle.
The shape changes its numbers, not its scale, so its texture does not stretch.
How a shape looks
A shape has no panel detail. It tiles a small swatch of plain surface from its colourway, mirrored at each edge, at the same texture density as the pack's parts. A bigger shape shows more tiles rather than a stretched one.
On the bundled atlas the team colour colourway is plain team colour, the same colour the team colour parts are drawn in. Tan is a grainy concrete, where the mirrored tiles show a repeating pattern. Grey is a flat light grey.
A shape takes the colourway most of the unit's parts and shapes use when it is added, or the pack's first one when the unit has none. It keeps that colourway. The piece panel has no control to change it, and Change part is not offered for a shape.
A cylinder, a tube or a cone can show a wheel hub on its flat ends instead. Tick Hub on ends in the piece panel. The hub is the round panel the pack draws for the shape's colourway, fitted to each end, so it stretches with the radius. On the bundled pack it is drawn at the parts' own density at a radius of 1.6 units, and it starts to look soft past 3.2 units. A tube's end ring shows the outer part of the hub. The choice is off for a new shape, and the side keeps its swatch either way.
A shape takes team colour only where the atlas's alpha channel says so, as a part does. The bundled atlas marks its whole team colour column, so its team colour parts and shapes show the player's colour in the builder, in thumbnails and in a game. Its tan and grey ones show none. An atlas pack can paint alpha into a swatch to give shapes team colour. See swatches.
Connectors on a shape
A shape's connectors are worked out from its kind and size, so they move when it is resized. They join like a part's: you can place a part or a module on them and save joins to them.
- A cylinder or tube has one at the middle of each end and four round the side.
- A cone has one on its flat bottom, one on its top when it is cut, and none at a point.
- A dome or bowl has one at its base and one at its apex. A whole sphere has the same two, and four round its middle.
- A wedge has one on each flat face and one on the slope, facing out from it. A pure wedge has no low end face, so it has no connector there.
A connector on a round side sits where the side is met going straight out from the middle. A part slid along it by grid steps moves along the flat, so it leaves the curve. A join to a connector the shape no longer has, such as a wedge's low end once Low end is 0, is broken, as in Joins.
Exporting a shape
A shape is written into the .s3o, .glb and .obj with its UVs inside its swatch on the atlas, and the ends of one with Hub on ends inside its round panel. It counts in the footprint, the collision volume and the model's radius and height. A shape whose kind this version of coilbox cannot make, for example one saved by a newer version, stops the export, and the message names the piece.
A model with a shape cannot be turned back into a project. Opening an exported .s3o as a project matches each piece to a part from the installed packs. A shape is not a pack part, so the model is refused, and the message names the first piece that did not match. Keep the unit's project if you might want to change it.
Modules
A module is an assembly you saved to use again, such as a leg, a turret or a cab. Build it once out of parts, save it, and drop it into the next unit. Earlier versions of coilbox called modules compounds. Modules saved under that name load unchanged.
Modules are the answer to "where do I get a leg from". The alternative is copying pieces out of somebody else's game, which is somebody else's work and somebody else's licence. A module is yours.
Save a module
Select the top piece of the assembly and press Save as a module in the left-hand toolbar. Select several pieces to save them as one module, and they keep their places against each other. A small panel asks for three things:
- Mounts on the unit by is the connector that joins the module to a unit. It opens on the connector at the lowest point of the first piece, which is the bottom face of a leg or a turret. Choose another, or No mount.
- Category is one word or two. The list offers Chassis, Wheel, Leg, Turret, Arm and Detail, plus the categories you already use. A module with no category is Uncategorised.
- Tags are extra words to search by, separated by commas.
Press Save and the strip opens on your modules. The module takes the name of its top piece. It keeps every piece under the selection, their roles, how they sit against each other and the joins between them. It also keeps the animation presets that move its pieces, such as Turret sweep for a turret. The unit's builder settings go with it only when a build preset does.
Add a module to a unit
Click a module in the inventory to start placing it, the same way you place a part on a face. Hover a connector of any part and a translucent copy of the whole module shows where it will go, with its mount on that connector. N moves the mount to the next connector of its piece, and T turns the module a quarter turn. Escape, or clicking the module again, stops. Click to add it. That is one undo step, and with symmetry on it adds the twin too.
Hold Alt and click a module to add it to the selected piece at once. It joins a free face by its mount, choosing the face the way a part from the strip does. If the selected piece has no free face, the mount lands on the piece's origin. In a unit with no parts yet there is nothing to hover, so a plain click adds the module at once too.
A module with no mount joins by whichever connector of its first piece faces back at the face you hover, and the view says it has no mount. With Alt, its first piece lands on the selected piece's origin. When the mount is on a piece deeper in the module, the module is placed with that connector on the face, but no join is saved.
Piece names are made unique as the module lands, because two pieces called barrel would be one piece too few for a script.
The module's presets are added to the unit's. A preset the unit already has keeps its settings. A notice says what was added, what the unit already had, and what was held back because a role is missing. A single leg's walk, for example, waits for a leg on the other side. With symmetry on, the twin is that leg, and the walk is added with it.
Two of the same module
A unit can hold the same module more than once, and each copy animates on its own. Every piece remembers the module it came from and which copy it belongs to, so two build arms are two arms rather than one arm and a spare. A preset written for one build arm or one set of legs is written for each copy: each arm aims at the build target, and each set of legs walks in a thread of its own. The Animation panel says how many it found, as in "Aim while building, 2 build arms". All the copies share one set of preset settings (issue #4315).
A duplicate or a pasted copy of a whole module is another copy of it. A piece duplicated inside a module, such as a second barrel on the same turret, stays part of that copy. A piece dragged out of a module to hang off something else stops being part of it. Pieces that came from no module count as one copy between them, so a unit built without modules gets the script it always had.
Swap a module
A piece that came from a module has a Swap module button under Change part in the piece panel. It lists the other modules, with those in the same category first, and has a search box. Pick one and it replaces the whole copy the piece belongs to, in one undo step.
- If the old module was joined to a face, the new one joins the same face by its own mount, with the same twist. If it was free, the new one takes its place.
- Pieces you hung on the old module move to the new piece with the same role. Any with no match go under the new module's top piece, and a notice names them.
- The new module's presets are added the same way as when you add a module. A preset that only the old module's pieces needed is removed, and the notice names it.
- Only the selected copy changes. Its mirror twin is a copy of its own and stays as it was.
When a module changes
When a module you used has changed, coilbox offers to update the unit. It never updates a unit by itself. Open a unit, or save a module while a unit is open, and a banner above the view lists each copy made from an older version of its module, as in "turret uses an older Turret". Update replaces that copy with the current module the way Swap module does, in one undo step. If you have edited pieces of that copy, the row says how many the update resets. Dismiss hides the banner until a module changes again or you open another unit.
Only a change to a module's pieces, presets, mount or builder settings counts. A new name, category or tags does not. A built in module counts as changed when an app update changes it. A copy added before coilbox began recording module versions is never offered an update.
Delete a module and its copies stay in your units as they are. The piece panel then shows "Module missing" above Swap module. Pieces added by the Weapon and Build arm buttons are never offered an update.
The inventory
The Inventory tab lists parts and modules in one place. The All, Parts and Modules buttons choose which kinds show, and one search box covers both. Recent lists what you last added to any unit, newest first, and keeps the last 24. Favourites lists the items you starred. Point at a tile and click its star, or focus one and press F, to mark it. Click the button again to see everything. Both lists belong to you, not to a unit, and an item that is no longer installed drops out of them. The Lego Parts page has the same inventory without the add-to-unit step.
Everything is in one grid, under the headings Shapes, Parts, Built in modules and Saved modules. Each heading counts its section, as in "Parts 373", and says "Parts 12 of 373" while a search, a category or a list narrows it. A section with nothing to show is left out. The arrow keys move through every section as one list.
All categories lists every part, with each shape's colourways side by side. Choose a colourway in the category menu and the Parts section shows each shape once, in that colourway, so clicking a tile adds that colourway. A shape the colourway does not have is left out. The bundled pack's one mixed part spans two colourways, so it is listed under every colourway. The heading then counts the colourway, as in "Parts 125" for the bundled pack's 124 shapes and the mixed part. The Change part drawer narrows the same way.
Clicking a tile also opens it in the panel beside the grid, in place of whatever the panel showed before. A part shows its size, its colourways, its tags and where it came from in the source file. Click another colourway to show that part instead. In the builder, when the part is the one being placed, the new colourway is placed instead. A shape shows its kind and default size, with Add in the builder. A module shows its pieces and, when it was lifted from a game, the game and units it came from, with Place in the builder. The panel closes with its X or Escape. On the Lego Parts page it stays in view while the grid scrolls.
With Modules chosen there is a category menu beside the search box. Search needs every term to appear in a module's name, category or tags. Click one of your own modules to rename it, change its category and tags, save it to a file, share it or delete it from the panel. The name, category and tags save when you press Enter or leave the field, and Escape gives up an edit. A module lifted from a game cannot be saved to a file.
Built in modules
The Inventory lists a set of modules that come with the app, under a "Built in modules" heading above your own. There are nine: a wheel, an axle with two wheels, a turret with a barrel and a muzzle flare, a leg, a pair of legs, a build arm, a hull section, a long hull section and a deck plate. Each one has its roles, joins, mount, category and tags set, and carries the presets that drive it: Wheels turning for the wheels, Walk, two legs for the legs, Turret sweep and Recoil on firing for the turret, and Aim while building and Nano from the nozzle for the arm. The turret and the build arm are the same pieces the Weapon and Build arm buttons add.
A single leg is the front left one. Its walk needs a right leg too, so it is held back until the unit has one. The pair of legs brings the walk with it.
You cannot rename, relabel or delete a built in module. Its panel has Make my own copy instead, which saves a copy among your own modules with a new id and a name like "Wheel copy", and opens the copy in the panel. The copy is yours to change.
Built in modules are not files. The app builds them each time it loads the parts pack, from parts in the bundled pack, so they work with any atlas. Each has a fixed id starting builtin., which stays the same between versions. If you replace the bundled pack with one that lacks a part a built in module uses, that module does not appear.
Share a module as a file
Click a module and choose Save to file in the panel to write it to a .coilbox-module.json file, which you can send to someone else. Built in modules can be saved too. Load from file, beside the module list in the strip and at the top of the Lego Parts page, adds a module from a file to your own.
- A module that uses parts no installed pack has still loads, and a warning lists the parts that are missing.
- If you already have a module with the same id, coilbox asks whether to Replace it or Keep both. Closing the question keeps both.
- A name you already use gets a number, as in "Turret 2".
- A saved built in module loads as a copy of your own.
- A file from a newer version of coilbox is refused.
The file holds the same text a copied piece puts on the clipboard, so you can also paste a file's contents into a unit.
Loadouts
One chassis often becomes several units: the same hull with a cannon, with rockets or with a build arm. A unit can hold several named loadouts of one chassis, and you switch between them in the builder (issue #3281).
The Loadouts button is under the game picker in the unit's card. Its popover adds, duplicates, renames and deletes loadouts. Once a unit has two, a switch beside the button picks the one you are editing.
- Add makes a loadout of the bare chassis. It starts with the current loadout's presets, unit definition and build settings, but not its own pieces and not a script you took over, because that script names those pieces.
- Duplicate copies the current loadout, pieces included.
- Delete removes a loadout and its own pieces. Delete down to one and the unit has no loadouts again.
Each piece is either part of the chassis, which every loadout shares, or the current loadout's own. An edit to the chassis shows in every loadout. A module you add while the unit has loadouts goes into the current one. A part you add goes on the chassis. To change which a piece is, select it and pick Every loadout or Only the current loadout in the popover. Making a shared piece a loadout's own leaves a copy in every other loadout, so nothing disappears from one you are not looking at. A piece under a loadout's own piece goes with its parent.
Each loadout has its own presets, generated or hand written script, unit definition fields and build settings. Everything else belongs to the chassis.
Exporting loadouts
A unit with loadouts exports each loadout as a unit of its own (issue #3282). The export drawer lists the loadouts with the unit name each will get, and a choice of This loadout or All loadouts. A unit without loadouts exports exactly as before.
The default unit name is the unit name and the loadout name joined by an underscore, lower case, with letters, digits and underscores only: Light on armpw is armpw_light. You can type a different name for any loadout in the drawer. Names are unique among the loadouts. A name that is already taken gets the smallest number after it, so a second armpw_light becomes armpw_light2.
Each loadout is written by the same export as any unit, so it has its own model (its pieces differ), script, unit definition and collision script. Each also has its own receipt for every game folder. A re-export of one loadout updates its own files and no other loadout's, and a hand edit to one loadout's definition survives a re-export without touching the others. Every loadout's in game name is the unit name and the loadout name, such as "Pawn Light". The texture atlas is shared and written once. The build picture is one picture for the unit, so each loadout gets a copy of it under its own name.
A unit exported before it had loadouts keeps its old files in the game. When you export a loadout into that folder, the old name goes into the same list, unless a loadout now exports under that name, in which case that loadout takes over the receipt. The drawer offers "Treat this file as coilbox's" for each loadout whose definition in the folder has no record of being written by coilbox.
Rename a loadout and export again, or delete one, and the old name goes into the list the drawer shows under "Left behind by a rename", with an offer to remove the files coilbox can prove it wrote. The workshop lists each exported loadout as its own unit.
Switching, adding, duplicating, renaming and deleting are each one undo step. Undo past a switch and you are back on the loadout you were editing, as it was.
Upgrade chains
A loadout can be an upgrade of another (issue #3286). In the Loadouts popover, pick From a loadout under its name. The chain is saved with the project as upgradesFrom on the loadout entry, holding the id of the loadout before it.
A chain is a line. The popover greys out a loadout that would make a loop, and one that another loadout already upgrades from. A saved file that holds a loop or a branch still opens, and the problems list reports it. Deleting a loadout in the middle of a chain links the next one to the one before it.
The switch and the Compare loadouts drawer list loadouts in chain order, and a column says which loadout it is from. In the drawer, each cell also shows what changed from the loadout before: a stat's difference (+50), or a mount marked added, removed or was <module>. The chain is stored and shown only. Writing it into a game as morph or upgrade data is decided in issue #3287, so an export does not carry it yet.
A loadout you are not looking at keeps its pieces as they were. If you deleted the chassis piece one of them hung off, it goes on the root piece when you switch back. If the chassis took its name meanwhile, it gets a number on the end.
Mount points
A mount point marks a connector of a chassis piece as the place a module goes (issue #3279). Select the piece, pick a connector under Mount points, then name it and type the module categories that fit, separated by commas. Mount points show in the viewport as orange squares, and the panel and the piece tree say what sits on each.
A module can only be placed on a mount point if its category is in the list, ignoring case. A module with no category does not fit, and a mount with no categories takes nothing. Swapping a module on a mount follows the same rule, and a part from the strip is refused. The message names the categories the mount takes. A module placed on a mount joins the loadout you are editing. Pasting or adding without choosing a face never picks a mount point. Dragging a module onto a mount joins it by the same rule, and a module that does not fit, or a plain part, lands free where you drop it with the same message.
Judging size
A unit built from small parts can look substantial and be a fraction of a real one, so the builder gives you two readings.
The ground is marked in elmos: fine lines every elmo near the origin, heavier lines every footprint step, which is the 16 elmos the engine reserves ground in. Translucent plates at the origin mark the 1x1, 2x2, 3x3 and 5x5 footprints, each with its size written on it, so "does this fit a 3 by 3" is something you can see.
The reference unit, the sun button in the bottom right, stands a real unit beside yours at its real size: Beyond All Reason's Armada solar collector, 43 elmos across and 29 tall. Anyone who plays these games has built hundreds of them. Its geometry is baked into coilbox rather than read out of an installed game, so it is there whatever you have installed. The same button can stand one of an installed game's units there instead, and that is the unit the stats panel compares yours with. Attribution and licence are in src/lego/reference/LICENCE.txt.
The measure tool, the ruler button in the bottom right or L, reads a distance out. Click one point on the model or the ground and then another. The viewport draws the line and lists the distance and the offset along x, y and z. A point snaps to the same anchors and guides a drag does, and holding Alt places it freely. Measurements stay until you press Clear. They are not saved with the unit or exported. Escape leaves the tool.
While you drag a piece, a readout shows how far it has moved on each axis and its size. The Pieces panel shows the selected piece's size under its position, rotation and scale.
Every figure is in elmos and in steps. A scene unit is an elmo, because the exporter writes each vertex's world position into the .s3o with no scale in between. A step is the pack's part unit, 0.25 elmo unless the pack states another, so 4 elmos reads as 16 steps. A pack with no unit shows elmos only. Distances are along the world axes, and a piece's size includes everything under it.
Which way it faces
A blue arrow on the ground, labelled front, marks model +z: the direction Spring.GetUnitVectors calls frontdir, pinned by the headless engine run on issue #565. Model +y is up, and model +x is the unit's left, being the negative of rightdir, not its right.
Unlike the grid and the axes helper, this one has no toggle. Get a unit's facing wrong and the only way to find out used to be in a game, so it stays on rather than risking a builder forgetting to turn it back on.
Roles and animation presets
An animation preset is a canned motion. It does not ask you to key anything: it asks which piece is the turret, which is the barrel, which is the front left thigh. That is what a role is, and it is why roles are a fixed list rather than free text.
Set a role on the selected piece in the Pieces panel. The roles are grouped: Body and Door under Structure, Turret, Barrel, Muzzle flare and Aim point under Weapon, Wheel, Track, Rudder, Wake point and Landing gear under Movement, a thigh, shin and foot for each leg, and three parts of a build arm.
Legs come in numbered pairs, with pair 1 at the front and the numbers going back along the body. A unit can have any number of pairs. The list always offers one pair more than the unit has, so to add a fourth pair, give a piece a role from pair 4.
Then open the Animation tab. Each preset says what it does and what it needs, and one it cannot use yet names the missing role rather than sitting greyed out with no explanation:
| Preset | Needs |
|---|---|
| Walk, two legs | A thigh and a shin on each side of one pair |
| Walk, four legs | A thigh on all four legs |
| Walk, any number of legs | A thigh and a shin on every leg, up to the last pair |
| Turret sweep | A turret, and a barrel if there is one |
| Wheels turning | At least one wheel |
| Rudder follows turns | At least one rudder |
| Front wheels steer | At least one wheel |
| Body rocks on starting and stopping | A body |
| Wake while moving | At least one wake point |
| Landing gear | At least one landing gear piece |
| Build arm | A build arm |
| Doors | At least one door |
| Hover and bob | A body |
| Aim point | An aim point |
| Recoil on firing | A barrel |
| Idle sway | A body |
| Body settles after a shot | A body |
| Turret looks around when idle | A turret |
| Wreck pose | A body |
| Break apart | Nothing |
| Aim while building | A build arm |
| Factory build cycle | A door |
| Nano from the nozzle | A nano emit point |
Applying one gives you sliders for its own parameters: stride time, thigh swing, sweep angle, kick distance and so on.
Three presets follow how the unit is moving, and play best under Driving along a path. They read the unit's speed, heading and direction while it runs, every 3 frames for the wheels and the body and every 6 for the steering.
- Wheels turning turns each wheel at the unit's speed divided by the wheel's radius, so a wheel rolls without slipping at every speed, slows as the unit brakes, and turns backwards when it backs up. The radius is half the width of the wheel's cylinder, tube or cone across its axle, times the scale it has in the unit. It takes the biggest such shape at or under the wheel piece. A wheel made from a part of the pack has no shape to measure, so it turns at the Turns per second rate unless you type a Wheel radius, which then applies to every wheel. The wheels read the speed while it runs rather than baking it in as the walks do, because the unit brakes after the engine's
StopMovingand its wheels should slow with it. - Front wheels steer swings the wheels ahead of the middle of the wheels with the unit's turning, up to the Largest angle slider, and straightens them when the turn ends. A unit with three axles steers the first, and a unit with one axle steers none. The two front wheels of a mirrored pair swing the same way, and the wheels swing the other way when the unit backs up.
- Body rocks on starting and stopping pitches the body back as the unit speeds up and forward as it brakes, then eases it level. Lean at full power is the angle for a unit speeding up at its whole acceleration, or braking at its whole brake rate, both from Movement, so a gentle unit rocks less than a sharp one. The lean follows the acceleration with a lag of about a third of a second.
Two presets add the small motions around a shot.
- Body settles after a shot defines the engine's
RockUnit, which the engine calls after a weapon fires with the direction opposite the shot in the unit's own space. A shot straight ahead lifts the nose and a shot to one side tips the top the other way. The lean snaps to Lean per shot in two frames and eases level with a lag of Settle time. The 2.75 degree default is what Balanced Annihilation'sROCKUNIT.Hturns the base by at full strength (500 of COB's 65536 angle units to a turn). A unit without this preset defines noRockUnit, so the engine makes no extra call on its shots. The preview callsRockUnitafter each shot with the opposite of the weapon's last aim heading, as the engine does. Do not apply it with Body rocks on starting and stopping, which turns the same piece about the same axis. - Turret looks around when idle turns each turret slowly between waypoints inside its yaw range after the unit has stood still, not aimed and not fired for Idle time before looking. A turret with no range looks Turn either side of straight ahead. The look starts from
Create, so a unit that has never moved does it, and stops at the nextStartMoving,AimWeaponorShot.StartMovingalso turns the turret back to centre.
Recoil on firing kicks each weapon's own barrel from its own Shot call-in. A flare beside the barrel, rather than under it, kicks with it.
Idle sway now starts from Create as well as StopMoving, so a unit that has not moved yet sways.
Play runs the script the presets generate, the same Lua an export writes, and shows what it does in the viewport. A mistake in the script shows up here rather than after export. Each run lasts 15 seconds and loops. Change a preset, one of its sliders or a role while a run is on screen, and the new script runs as soon as you stop editing.
What happens to the unit, under Preview, picks what the script is put through: moving, starting and stopping, standing still, switched on, building, hit and destroyed, aiming and firing, or being loaded into a transport. A scenario with something to aim at, build or carry puts a stand-in in the scene, a plain shape the script is told about, so an aim has a target you can check it against.
A weapon stops aiming when a moving target leaves its range or its arc, as it does in the engine. It checks on the first frame and every 15th frame after. A line in the Animation panel names the first weapon to stop, the frame and the reason, such as Gun (weapon 1) stopped aiming on frame 30: the target is out of range.
Driving along a path moves the whole unit. It drives straight ahead, round a right turn, round a circle, or through points you click on the ground after picking Your own path. It goes at the speed and turn rate under Movement, or one elmo a frame when the unit has none, and steers the way the engine steers a ground unit: it cuts corners and slows for tight turns. The script is told StartMoving when it sets off and StopMoving when it arrives, and HEADING and CURRENT_SPEED follow it on every frame. The engine sends ChangeHeading only to a Lua script, and only once a game lowers minScriptChangeHeading, so it is off unless you switch it on. A unit with a reverse speed backs up when the engine would, and the Behind the unit path shows it. It speeds up at the unit's acceleration and brakes at its brake rate, 0.5 elmos a frame squared each when the unit sets none. The camera button in the viewport stops the view following the unit. Aircraft are not covered.
A scenario the unit has nothing to do in is marked Nothing to do in the list. The line under the picker names the presets that would give it something, or says presets do not cover it. You can still pick it.
The scrubber under Play steps through the run one frame at a time. Marks under it show the frames where something happened, such as a shot, and clicking one jumps to that frame.
With several presets applied, the play button on a preset's own row plays that one alone, in the scenario that shows it off. The main button then reads Play all and goes back to all of them.
Nothing about playback is written to the unit, so stopping restores exactly what you built. Playback stays off if your system asks for reduced motion.
Presets are demonstrations of motion, not the motion itself in every case. A turret in a game points where the target is, and the sweep you see in the viewport is what that motion looks like.
Poses
A pose is a stance you hold by hand, such as arms raised or doors open, kept under a name. Open Poses in the viewport controls and press Pose the unit. The unit is shown as the engine draws it, and the move and turn handles now change the pose. They do not change the piece, so leaving the mode puts the unit back as you built it. Scale falls back to move, and a joined piece can be turned but not moved off its face.
Type a name and press Save to keep the pose on the unit. Each pose in the list can be applied, overwritten with the pose you are holding, duplicated, renamed (edit the name) and deleted. Applying a pose starts from it, so you can adjust it and save the result as another pose or over the same one.
Undo and redo step through the pose you are holding first. When it has nothing left to step over, they undo the unit's own edits, such as a rename or delete in the pose list.
A pose stores only the pieces you changed. For each piece it holds a turn in radians about x, y and z, in the order the engine applies a script's turns, and a move in elmos. These are the numbers a Turn and a Move take. A pose that names a piece you have since deleted keeps the entry, skips it when shown, and says how many pieces are gone.
Actions
An action is a motion made of saved poses in time. In the Animation panel, press the plus beside Actions. The timeline opens beside the view. Add poses as keys, give each the seconds to reach it from the key before, and pick the call-in that starts it: Create, StartMoving, StopMoving, Activate, Deactivate, StartBuilding, StopBuilding, a Shot call-in, or a function of its own name. The first key's time is from rest, or from the last key when the action loops.
A looping action stops on the matching call-in (StopMoving for StartMoving, Deactivate for Activate, StopBuilding for StartBuilding) and the pieces return to rest. Any other trigger loops until it is started again. A function of its own gets a <name>Stop function. An action that does not loop plays once and holds its last pose.
The script writes each action as a thread. Each Turn and Move has the speed that reaches the key on time, worked out per axis as the distance divided by the seconds, and a Sleep waits for the key. Times are rounded to whole frames. A key whose pose was deleted is skipped and its time goes to the next key. Pieces a pose names that the unit no longer has are skipped. Each action has a signal of its own, written as a string, so presets and actions together are not limited by the bits of one number.
The preview plays an action by running this script, so what you see is what the game runs. Actions and presets that move the same piece fight, and the one called last wins. The panel and the problems list name those pieces, with both owners.
An action can ease in and out. Set a blend time on the action, or one for the unit under Actions in the Animation panel, in seconds. When an action starts over another, it reaches its first key over its blend in time from wherever the pieces are, instead of from rest. A looping action that stops returns to rest over its blend out time instead of at a fixed speed of 4. A unit where no action has a blend time is written exactly as before.
A unit that blends gives a piece two actions share to whichever started last: the other action's thread ends, and its stop no longer sends that piece home. The script keeps its own record of where each axis is, from the speed of the last call and Spring.GetGameFrame. It does not call GetPieceRotation, because the preview's script runtime has no such call. Only moves an action makes are recorded, so a blend does not start from where a preset left a piece.
Units that build
The engine asks a builder and a factory different questions, so they get different presets.
A builder is handed a heading and a pitch worked out from whatever it is building, recomputed every time. Aim while building turns the arm base to that heading and the arm to that pitch, waits for both, and swings them home when the job stops. A factory is handed nothing at all, because it builds inside itself and there is nothing to point at, so Factory build cycle opens its doors while it works and shuts them after.
Nano from the nozzle is not motion. It answers the engine's question about where the build spray comes out, taking each piece marked Nano emit point in turn. Those are usually empty pieces called nano1, nano2 and so on, carrying no geometry: add them with the empty piece button. Without this the spray comes from the model's origin, which on a tall builder is somewhere around its feet.
Build arm used to sweep whenever the unit was switched on, which for a builder is nearly always. It now runs while the unit is actually building. If you applied it before this change, that is what altered.
The Build arm button above the piece list (the wrench) adds the whole arm in one step: a base, an arm on it, a nozzle on the arm and an empty nano point at the nozzle's end, each with its role set. It also applies Aim while building and Nano from the nozzle, and it is one undo step. It hangs off the selected piece, or the root when nothing is selected.
At the top of the Animation panel, under What it builds with, two lines say what the unit has become. The first names the kind and why. A builder that moves, with a movement class and a speed above zero, is a mobile builder. One that does not is a static builder. A static builder is a factory when the game's file for the unit has a yardmap, and the engine needs nothing else (IsFactoryUnit is a builder that cannot move and has a yardmap). The builder writes no yardmap, so a unit is a factory only after the workshop adds one to the exported file. The second line says what it builds, read from that file's buildoptions. The build list belongs to the workshop, so the line links to Unit tweaks rather than offering an editor.
Two things happen automatically for a unit with any build role on it.
Its definition is written as a builder, with builder, workerTime, builddistance and canassist. The three numbers go together because the engine reads a builder with no work rate as not a builder, so builder = true on its own clears itself. What it builds with at the top of the Animation panel sets the work rate and the reach.
Its script sets build stance. That one is written for every unit, builder or not. CBuilder::StartBuild refuses to begin until the unit says it is in stance, and a script is the only thing in the engine that can say so, so a builder whose script leaves it out queues a build and waits forever with nothing in the infolog to explain it.
Units that fight
The Weapon button above the piece list (the crosshair) adds a weapon module in one step: a turret, a barrel pointing forward and an empty muzzle flare at the barrel's end, each with its role set. It also applies Turret sweep and Recoil on firing, and it is one undo step.
Every turret and aim point on the unit is listed under Weapons in the Animation panel, with a picker for what it fires. The picker offers the weapons in the workshop projects for the unit's game, then the game's own weapon table. Beside a pick it shows the weapon's range, damage and reload time. Arc, degrees narrows where it can fire, and Facing, degrees right turns that arc away from the front. Left empty, the arc is the engine's full circle.
The unit's game is the one it was opened from, or else the game it was exported into. A unit with neither has no weapons to offer, and the picker says so when it is opened.
On export, slot 1 of the definition's weapons table is the first turret or aim point with a weapon picked, slot 2 the next, and so on in piece order. A slot names a game weapon as the game keys it, in both name and def. A narrower arc adds maxangledif and maindir.
The generated script numbers its weapons the same way, so AimWeapon2, AimFromWeapon2, QueryWeapon2 and Shot2 are slot 2. Each weapon aims its own turret and barrel, fires from its own flare and kicks its own barrel on recoil. A barrel or flare belongs to the nearest turret or aim point above it in the piece tree, which is where the Weapon button puts them. One with no turret above it goes to the first weapon that has none. Until any weapon is picked, every turret and aim point is numbered, so the Aiming and firing scenario aims all of them. Each weapon has its own signal, so aiming one never cancels another's aim.
A weapon from a workshop project is a reference, not a copy. Each export reads it from the project again, so the weapon you edit in the workshop is the one the game gets, and writes it to weapons/coilbox_<unit>_<key>.lua. That is the file and the full name <unit>_<key> the workshop's own compile writes for an equipped weapon. If the project or the weapon is gone, export leaves that slot out and says so.
Splinter Faction, Balanced Annihilation 15.9.8 and Beyond All Reason all read weapons/*.lua through the engine's gamedata/weapondefs.lua, and all three also copy a unit's own weapondefs into the weapon table from their gamedata/weapondefs_post.lua. The builder uses the file rather than the unit definition, so a change you make to the weapon in the workshop reaches the game on the next export.
The weapon range button in the viewport's camera group, beside the collision and aim point buttons, draws each weapon on the ground. It is off until you turn it on. A turret that turns all the way round gets a ring at its range, and one with a narrower arc gets a wedge covering only that arc. A line drops from the piece the range is measured from to the middle of the ring. Each weapon has its own colour and a label such as 1 lightlaser, stated range 180. The drawing follows the engine's own range and arc tests. A cannon's range in the engine depends on its shell speed and the map's gravity, so for a cannon the ring is its stated range (issue #4274).
The weapons table is one of the fields the build decides, so a re-export brings it up to date while nobody has edited it. Once you change the table in the file, export leaves it as you wrote it. See What export writes for the rule.
The script behind the presets
The Script tab, in the strip along the bottom, shows the Lua the presets generate, ready to copy. The Script button at the top of the Animation panel opens it. It declares a local only for the pieces it actually uses. It is also the script the preview runs, so what plays in the viewport and what an export writes cannot drift apart.
The engine calls this the unit script, and it is written on export to scripts/<unit>.lua. Animation is most of what it does, which is why the builder puts it behind the Animation panel, but the same file is where a game's own Create, Killed and AimWeapon hooks would go. It is loaded by the unit script framework that games ship in LuaGadgets/Gadgets/unit_script.lua, which reads the file named by the unit definition's script key.
A unit with weapons gets one set of AimWeapon, AimFromWeapon, QueryWeapon and Shot for each weapon, numbered like the definition's weapon slots. See Units that fight.
Take ownership of this script hands it to you, so you can edit it. From then on the Script tab is an editor, the text is stored on the unit, and an export writes exactly what you wrote. The presets stop generating it at that point. The Animation panel drops the preset list and plays your text in the same player.
You do not need to take ownership to see the unit run. The preview already plays the generated script, so ownership is only for changing it by hand.
A unit opened out of a game brings its own script with it. See Opening a unit from a game.
Import on the Script tab loads a .lua unit script from a file. To take the script of another unit in the same game, open it under Game units in the inventory and choose Use its script. A compiled unit's .bos is converted first, as it is when a unit is opened from a game, and the library files and unit definition the script reads come with it.
The script's piece names are matched to the unit's. A name that differs from one of the unit's pieces only in case is changed to the unit's spelling, because an .s3o keeps its piece names exactly and a script asking for Arm cannot find arm. Any other name the unit lacks is listed above the editor, and Match pieces renames each one to a piece you pick.
A simple script becomes actions of poses, which you can then edit like any other. See Actions. Everything in the script has to fit, or none of it is taken apart and it is kept as the unit's own script, exactly as written apart from the case changes. The unit also needs no presets applied and no compiled script, because either would keep playing beside the actions. What fits:
localpiece declarations, one name or several to a call, andlocalsignal numbers or strings.- A
local functionthread made ofTurnandMovecalls with number arguments andSleep, with an optionalSetSignalMaskfirst and at most onewhile true doloop at the end. EachSleepends a key. Every axis that moves needs the speed that arrives exactly when theSleepends, which is the distance divided by theSleepin whole frames (floor(ms / 33)of them, at 30 a second). The last key of a thread that does not loop has noSleep, and its speeds have to agree on one time. - A loop with no lead in, or a lead in that plays the same keys in the same times as the loop, which is how the builder writes one.
- A
script.call-in that starts the thread withStartThread, alone or after aSignal. That call-in becomes the action's trigger. A call-in the engine does not make becomes the action's own function. - For a looping thread started by
StartMoving,Activate,StartBuildingor a function of its own, a stop call-in (StopMoving,Deactivate,StopBuildingor the function's name withStopafter it) that calls alocal functionof aSignalfollowed byTurnorMovecalls back to 0. - Any other call-in either empty or exactly what the builder writes for it, such as
Killedexploding the root piece. A call-in left empty gets the builder's version.
A script the builder wrote from actions reads back to the same actions, and those write the same script again. Two things can change in a hand written script that fits. A stop sends pieces back to rest at the builder's speed, and a loop with no lead in reaches its first key from rest in that key's time, where the script took the loop's speed.
Discard this script and use the presets gives it back. The stored text goes and the unit is generated from its presets again. Undo brings the text back if that was a mistake, so copy it first if you want to keep it past this session. The case worth knowing about: a unit whose script was taken over and then emptied animates nothing and no preset can reach it, and this is the only way out short of editing files on disk.
Start from a skeleton
A skeleton is the stick figure of a unit: where its joints are, what each joint is for and how it moves. A unit started from one walks, rolls or aims in the preview before it has a single part, and its parts go on joints that are already in place.
Press New unit and pick a body plan from the list under Blank. Set the size it should fit, as in Size a skeleton, and press Start. Back returns to the list. The unit opens with an empty piece for each bone, each with its role set, and the plan's presets applied in the Animation panel. Then hang parts on the bones. A unit that already has pieces can be given a plan too. See Fit a body plan to a unit you already have.
The body plans
A plan is built only from the roles and presets that already exist, so it can do only what they can. The line under each plan in the list says what it is, and for a hovercraft, ship or aircraft what it will not do.
| Plan | Bones with a role | Presets it applies |
|---|---|---|
| Two legs | A hip with the Body role, and a thigh, shin and foot on each side | Walk, two legs |
| Four legs | A body, and a thigh, shin and foot on each of four legs | Walk, four legs |
| Six legs | A body, and a thigh, shin and foot on each of six legs | Walk, any number of legs |
| Eight legs | A body, and a thigh, shin and foot on each of eight legs | Walk, any number of legs |
| Wheels | A body, and a wheel at each end of each axle | Wheels turning |
| Tracks | A body, and a run of road wheels on each track | Wheels turning |
| Turret building | A base with the Body role, a turret, a barrel and a muzzle flare | Turret sweep, Recoil on firing |
| Building | A base with the Body role | None |
| Hovercraft | A hull with the Body role | Hover and bob |
| Ship | A hull with the Body role, a turret, a barrel and a muzzle flare | Turret sweep, Recoil on firing |
| Aircraft | A body, a turret, a barrel and a muzzle flare | Turret sweep, Recoil on firing |
No plan sets a movement class, so every one exports as a unit that cannot move until you pick one under Movement.
Legs
Both leg plans have a leg length from hip to ankle, a stance width between the hips, and a body height, which places an empty torso bone above the hip where a turret goes. Each ankle is on the ground. The defaults are the medians of Splinter Faction's 23 two legged walkers: 18.8 leg length, 29.8 stance and 5.4 body height. Four legs uses the same legs and adds a body length of 27.7 between the front and back hips.
Six and eight legs use the same legs again, with the pairs spaced evenly along the body. Their Gap between leg pairs is the distance from one pair's hips to the next pair's. No six or eight legged model has been measured, so it starts at the four legged plan's 27.7.
Gaits
Walk, any number of legs counts the unit's leg pairs from its roles and walks them in a wave. Each pair puts its feet down as the pair in front lifts, and the right leg of a pair is half a cycle behind the left. So steps run from the rear to the front along each side. This is the wave gait for a walker of any number of legs, as Song and Choi give it in "The optimally stable ranges of 2n-legged wave gaits" (IEEE Transactions on Systems, Man, and Cybernetics, 1990).
Time on the ground picks the gait:
| Legs | At half the cycle | Longer on the ground |
|---|---|---|
| Two | The legs in opposition, as Walk, two legs | Both feet down for part of each step |
| Four | The trot, as Walk, four legs | The crawl at three quarters, one foot up at a time |
| Six | The tripod: front and rear left with the middle right, then the other three | Fewer feet up at a time, and one at a time from five sixths |
| Eight | Four at a time, alternating | Fewer feet up at a time, and one at a time from seven eighths |
It starts at the least time on the ground that keeps three feet down on average: half for six or more legs, and three quarters for four. Three quarters is where the range McGhee and Frank (1968) found the four legged crawl most stable over begins.
Legs come in pairs, so an odd number of legs is a pair with a leg missing. The Animation panel names the missing thigh and shin, as it does for any role a preset needs.
Wheels and tracks
The wheeled plan has a body and a pair of wheels for each axle. Its proportions are the number of axles, the axle spacing, the track width between the left and right wheels' middles, and the wheel height, which is the height of a wheel's middle above the ground. The defaults are the median two axle vehicle in Splinter Faction: 2 axles, 19.6 apart, 28 wide, at 4.7.
The tracked plan has a body, a bone for each track and a run of road wheels hung off each track. Its proportions are the track length, the track width between the two tracks' middles, the track height and the number of road wheels a side. Splinter Faction has no tracked model with a separate track, so the defaults are the median Spring 1944 tank: 47.4 long, 18.3 wide, 8.8 high, with 6 road wheels a side. The road wheels are spread over 0.65 of the track's length, with their middles 0.34 of the track's height above the ground, both also Spring 1944 medians.
A wheel spins about the unit's left to right axis, so a part modelled with its axle along another axis turns end over end.
There is no role for a track, so a track bone has none. Hang the tread on it. The road wheels turn and the tread does not. A unit script cannot scroll a texture: the calls a Lua unit script has in Recoil move, turn, spin, scale, show, hide and explode pieces, and none of them reads or writes texture coordinates.
Buildings
The turret building's proportions are the base height, which is the turret's joint above the ground, the turret height, which is the barrel's joint above the turret's, and the barrel length, from the barrel's joint to the flare. The defaults are the median of Splinter Faction's 13 static defences: 41, 13.7 and 41.1.
It has no aim point. A piece with the Aim point role carries a weapon of its own, so a turret and an aim point together are two weapons, and the script would aim a second weapon the unit does not have.
The plain building is the base alone, with no proportions and nothing to animate. No Splinter Faction building has a door piece, so add a door by hand with the Door role and Doors.
Neither plan has a width or a depth, because no bone sits at the edge of the base. A building's width and depth are its footprint, which comes from the parts hung on it. A building with no parts yet exports with a 1 by 1 footprint.
Hovercraft, ships and aircraft
Hovercraft, aircraft and ships says what each of these can be given today.
The hovercraft has a root on the ground and a hull at the gap above it. Hover and bob bobs and rocks the hull. A deck bone sits on top of the hull, a skirt bone on each side and a wake bone at the stern. The wake bone has the Wake point role and the plan applies Wake while moving. The deck is where a turret goes. Its proportions are the hull length, width and height, and the gap under the hull. Splinter Faction has no hover movement class, so the defaults are the median of Beyond All Reason's 20 hovercraft: 40.2 long, 31.1 wide, 14.9 high, 0.1 off the ground. Two of them dip just below the ground, so the gap starts at 0.
The ship is the turret building on a hull. The hull is the root, at the waterline. A wake bone with the Wake point role and a rudder bone with the Rudder role sit at the stern. Its proportions are the hull length, the deck height, which is the turret's joint above the hull's, the turret height and the barrel length. The defaults are the median of Splinter Faction's 10 ships: 89.2, 9.3, 5.8 and 14.3, with the gun's three from the 8 that carry a turret. No bone sits at the side of the hull, so the plan has no beam. It does not rock, so add Hover and bob with a small bob for a ship on a swell.
The aircraft is a body and a gun, with the barrel's joint on the turret's, which is how all 7 of Splinter Faction's aircraft with a gun carry it. Its proportions are how far the gun sits ahead of the body's joint, which is negative for a tail gun, how far above, and the barrel length. The defaults are the median of those 7: 5.1, 1.9 and 5.2. Hover and bob is not applied, because it keeps running after the aircraft lands.
Describe it instead
Describe it instead, under the plan list, asks four questions in place of a plan:
- How does it move? Two legs, Four legs, Six legs, Eight legs, Wheels, Tracks, Hovers or Does not move.
- How many weapons? 0 or 1.
- Does it build? No or Yes.
- How big? The same size fields as for a plan.
The first answer picks the plan. A unit that does not move is the turret building with a weapon, and the plain building without one. A weapon adds a turret, a barrel and a muzzle flare, with Turret sweep and Recoil on firing. Building adds a build arm base, an arm, a nozzle and a nano emit point, with Aim while building and Nano from the nozzle. These hang off the torso of a walker, the body of a vehicle, the deck of a hovercraft and the base of a building. The gun takes the turret building's turret height and barrel length, and the nano point starts 17.1 elmos up, the median of 63 Splinter Faction models with a nano piece. The Skeleton tab lists these with the plan's own proportions.
The unit is named for the answers, such as "Wheels, gun, builds". The form has no ship or aircraft, because both plans always carry a gun. For a second weapon, use the Weapon button afterwards. See Units that fight.
Size a skeleton
After you pick a plan, New unit asks for Footprint across and Footprint deep in steps of 16 elmos, the step the engine reserves ground in, and a Height in elmos. The fields start at the plan's own size. Coilbox sets the proportions to fit, and keeps the size as the unit's target.
The size is the box the joints span, not the parts. The footprint check in the problems list measures the finished unit. Each plan fits the size its own way:
- Two legs: stance is the width and the length, since the plan has no body length. Leg length and body height share the height in the proportion they already have. A footprint that is not square gives the stance of the smaller side.
- Four legs: stance is the width and body length is the length. The height is shared as for two legs.
- Six and eight legs: stance is the width, and the gap between pairs times the pairs less one is the length. The height is shared as for two legs.
- Wheels: track width is the width, the axles' span (axle spacing times the axles less one) is the length, and wheel height is the height. The number of axles is kept.
- Tracks: track width, track length and track height.
- Turret building: base height and turret height share the height. No joint places the base's width and depth, so the target is the footprint.
- Building: no proportions, so the target is the whole size. Its default is 9 by 9 steps, the median of Splinter Faction's 23 buildings with no weapon, and 29.1 elmos tall, which is the reference solar collector's height because no building height has been measured.
- Hovercraft: hull width, hull length, and the gap under the hull and the hull height share the height.
- Ship: hull length, and deck height and turret height share the height. No joint places the beam, so the width is the target's. Its default is 6 steps, the median of Splinter Faction's ships.
- Aircraft: no joint places its width, length or height, so the target is the whole size. Its default is 4 by 4 steps and 14.5 elmos tall, the median of Splinter Faction's 17 aircraft.
A size that needs a proportion past its range holds that proportion to the range, so the size can come out different from the target. Where a height is shared and one part is held, the other takes what is left.
The Skeleton tab shows the size, as in "Size 3 by 5 steps (48 by 80 elmos), 40 elmos tall". When a proportion change takes it past the target it says which way, as in "Past the target in height." Type a new size under it and press Fit to fit the skeleton again, as one undo step.
The reference unit stands beside the largest ground plate. A unit sized wider than that plate moves it further out, so the two do not overlap.
Change the proportions
The Skeleton tab in the side panel, after Aim, is there on any unit with a skeleton. It lists each of the plan's proportions with a number and a slider. While it is open, the view shows a handle on the joint each proportion moves most, such as the top of a leg or a foot. The number, the slider and the handle all change the same value. A drag shows the result as you go, and letting go is one undo step. A count, such as axles, has no handle. A number past the proportion's range is held to it, and the field says so, as in "Held to 5 to 40."
A bone is a piece like any other, so you can drag it by hand. It keeps your change until a proportion that places it changes, and then goes back to where the plan puts it.
Fewer axles or road wheels remove the bones no longer needed. A bare bone goes without asking. When one carries a part or has a piece hung on it, the panel names it and asks first, with Remove and Keep. A piece hung on a removed bone moves up to the bone's parent and stays where it was.
Hang a part on a bone
Select a bone and click a part in the inventory. The part hangs off the bone and lies along it towards the next bone, with its near end on the joint, so a thigh hangs from the hip towards the knee and turns about the hip. The part keeps its own size and is not stretched to fit the bone. A bone with no bone below it, such as a foot, gets the part centred on its joint, unturned. Hold Alt as you click to put the part on the joint without turning it.
A bone has no faces, so nothing joins to it. With symmetry on, the twin bone on the other side gets the mirrored part.
To remove a skeleton, open the Skeleton tab, press Remove skeleton and confirm. Every piece, role and preset stays, the tab and the skeleton in the view go, and it is one undo step.
See the skeleton
A unit with a skeleton shows it in the view: a line from each bone to its parent, a dot on each joint and the bone's role beside the dot. The bone button beside the collision button, or K, shows and hides it. It is on whenever a unit with a skeleton opens. It draws through the parts, a click passes through it to the part behind, and it is never exported.
While the preview plays, the skeleton moves with the pieces, so a skeleton with no parts walks, rolls or aims on screen. The proportion handles hide until it stops.
Skeleton checks
Three checks look for mistakes that look right in the view and go wrong in a game. They run on every unit, skeleton or not, and list under Skeleton in the problems above the viewport. Click one to select the piece.
- A foot or a wheel off the ground, as in
"lfoot" is 2 elmos above the ground.It measures the lowest point of the piece and what hangs off it. A foot with no part is judged by its joint, the ankle. A wheel with no part is skipped, because its joint is the axle. - A thigh, shin or build arm that turns about its middle, as in
"lthigh" turns about its middle, not its joint.Set its Turns about to the end at the joint. Feet are not checked, because a part on a foot bone sits centred on the ankle. - A side that does not match the other, as in
"rshin" does not mirror "lshin".or"lthigh" has no right side piece.A pair is matched by the twin the plan saved, or else by the nearest piece with the mirrored role.
A piece is not listed when the piece it hangs off is, because one mistake moves everything below it.
Fit a body plan to a unit you already have
A unit built without a plan, or opened from a game, can be given one by saying which of its pieces is each bone. Press Fit a body plan, the bone button beside Test in game at the top of the builder, and pick a plan.
The drawer on the left lists the plan's bones, with one highlighted. Select a piece in the view or the piece tree and it fills that bone, and the next unmatched bone is highlighted. Click a bone to highlight it again, or its cross to unmatch it. The view and the tree stay usable while the drawer is open.
- Gun and Builds add the same bones as Describe it instead. Gun is not offered for a plan that already has a turret.
- A plan with a count, such as Axles, asks for it first, because the count decides which bones there are.
- Coilbox suggests pieces but never picks them. Use suggestions takes them all, and the Use button on a bone's row takes one. It suggests the unit's root for the root bone, the only piece with a bone's role, or a piece with the bone's name. It suggests a leg only from a role already set, never from a name.
Before you press Fit, the drawer lists each role it will replace, each preset it will hold back and what that preset needs, and each proportion it cannot measure. Fit is one undo step. It sets the role of each piece you picked, marks it as that bone and adds the plan's presets. A preset the unit already has keeps its settings. A bone with no role in the plan, such as a torso or a track, leaves its piece's role alone. Fitting replaces any skeleton the unit had.
Nothing moves. Each proportion is measured from where the picked pieces are, and one whose joints you did not pick is left out. The Skeleton tab then reads, for example, "Two legs, fitted to this unit's pieces" and lists each value or "Not measured". It has no sliders, handles or size fields, because changing a proportion would move pieces you placed.
Fitting differs from opening a unit from a game. Opening one proposes roles read from the unit's script, and never overwrites a role you set. Fitting is you saying what each piece is, so it replaces the role of every piece you pick. Opening a unit never proposes legs, so fitting a leg plan is how a walker from a game gets its walk.
What is stored with the unit
A unit started from a plan holds ordinary empty pieces, one per bone, with their roles set, and the plan's presets in its animations. Export, the script and the .s3o see nothing but pieces. The plans are part of coilbox, in src/lego/bodyPlans.ts, src/lego/vehiclePlans.ts, src/lego/buildingPlans.ts and src/lego/hoverAirShipPlans.ts. The unit file records two things more:
skeletonon the unit, which names the plan and holds the current value of each proportion, the size intarget, andfittedfor a plan fitted to the unit's own piecesboneon each piece the plan made, which names its bone in the plan
A piece with no bone is free, and changing a proportion never moves it. A copy of a bone, by duplicate, paste, mirror or a ring, is free. A bone moved to hang off a different piece is free too, because the plan places a bone against its own parent. A unit made before skeletons existed has neither field and opens as it always has. A unit made from a plan that this version of coilbox does not have still opens, and keeps its record and its bones.
A skeleton is for a whole unit, and a module is for a part of one, so they are kept separate. A module never carries a bone.
Health, cost and stats
A built unit's health, metal cost, energy cost, build time and mass come from the Worth table in the Animation panel. There is no field for one unit's health or cost. The table works them out from what the unit is made of, so a bigger unit is worth more.
The table has a column for each of the five, and these rows:
- Per unit is what every unit gets, so a unit with hardly any parts is not free.
- Per volume is what each unit of a part's volume adds. A part's volume is its bounding box times its scale and the scale of every piece above it. A long beam is worth more than a short one, and moving a part changes nothing.
- One row for each shape of part the unit uses. A number in a shape's row replaces the per volume amount for parts of that shape. A blank one leaves it to the per volume row.
The totals sit above the table. Export writes them as maxdamage, buildcostmetal, buildcostenergy, buildtime and mass, the spellings Splinter Faction and Balanced Annihilation both use. A mass of 0 is left out, so the engine uses the metal cost instead.
A new unit starts on placeholder amounts that load in the engine and say nothing about any game's economy, and the section says so. The table is stored on each unit. Save table keeps it so other units can use it, and Use saved table replaces this unit's table with the saved one. A unit opened whole from a game has no parts to total, so it has no table.
The stats panel
Stats, below Weapons, shows the unit's cost, health, speed, longest weapon range and damage per second. Beside them are the same numbers for the reference unit: pick one of a game's units with the reference button in the bottom right of the view. A number the unit does not have reads None.
The numbers are the ones the next export would write. A field changed by hand in the game's file shows the file's value instead, because that is the one export keeps. The panel changes nothing. Once the unit is exported into a game, each number links to its field in Unit tweaks.
Where to change a number
The unit's file in the game, units/<unit>.lua, is the only place a built unit's stats are kept. The builder writes the fields the build decides: the worth table's totals, movement, the builder keys, the weapon slots and the rest listed under What export writes. Unit tweaks can change any field, including those. Once a change from Unit tweaks is written into the file, export treats that field as set by hand and stops updating it.
Opening a unit from a game
A model opened out of an installed game arrives as geometry with a modeller's names on it. Nothing in a model says which piece is the turret, so coilbox goes and asks the unit's own script, which is the thing that turns the turret.
Where that script is comes from the unit definition's script key, resolved the way the engine's unit script framework resolves it rather than as a path. A game that moved to Lua while keeping the old .cob names in its definitions still resolves.
Lua is offered as the unit's own script. Keep it and the unit animates the way it does in its game, and an export writes it back. The presets stop applying while it does, and the Script tab hands it back whenever you want them.
A .cob is compiled, and coilbox writes Lua, so one of those is never taken on. It is disassembled and shown for reading instead, straight from the bytes, so nothing is copied out of the game and the file itself is untouched. The unit opens on the presets.
Alongside the script come proposals for what its pieces are for, in two groups, because they are different kinds of claim:
- The script named these. It hands the piece back when the engine asks.
QueryNanoPieceansweringnano2is the script saying whatnano2is for. - These moved when the unit was asked to work. Worked out from what turned and which way. A piece that turns horizontally when the unit is told to aim is a turret on nearly every unit ever shipped, and it is still a reading rather than a declaration.
Legs are never proposed. Which of six moving pieces is the front left shin is not something motion reveals, and the walk presets animate a unit inside out if it is guessed wrong. To give a walker its legs, fit a body plan.
Nothing is applied until you accept the unit, every proposal is on screen before that, and a role already set by hand is never overwritten.
What export writes
Export asks for a game folder, which is the folder holding objects3d and unittextures. For a game you are working on that is the .sdd directory. The folder is remembered on the unit, so exporting again after a change is one click.
It always writes:
objects3d/<unit>.s3o, the model.units/<unit>.lua, a unit definition. Without one the engine has nothing to spawn.language/en/coilbox.json, but only for a game that names its units in a localisation file rather than in their definitions. See Where the unit's name goes.weapons/coilbox_<unit>_<key>.luafor each workshop weapon the unit fires, rewritten every export. See Units that fight.objects3d/coilbox/<unit>_dead.s3oandfeatures/coilbox/<unit>_dead.lua, the wreck. See The wreck.
It writes, if you leave the boxes ticked:
scripts/<unit>.lua, the unit script the animations generate.The pack's atlas into
unittextures/. Every unit built from a pack names the same texture, so this only needs doing once per game rather than once per unit.unitpics/<unit>.png, the build picture, but only once you have taken one with Build picture. See The build picture.
It can also write a .glb, or an .obj with its .mtl and a copy of the atlas beside them. Neither is read by the engine. Both go into a blender folder alongside the game's own, for taking the unit into Blender to check it against the .s3o or finish it by hand.
To open the unit in Blender, use the .glb or .obj, not the .s3o. The builder writes no second texture, and the S3O Kit add-on skips its material setup when the second texture name is empty, so an .s3o opened with it shows no texture. S3O Kit also draws a PNG atlas mirrored vertically, even though the file is right for the engine. See the engine load checklist.
Generated shapes are written like parts. See Exporting a shape.
A re-export keeps your edits. The script and the unit definition are meant to be edited, so export never overwrites a change you made to either, whether you made it in a text editor or through the workshop.
- The unit definition is updated field by field. Some fields come from the build: the name and description, the footprint, the collision volume, the worth table's totals, movement, the builder keys, the weapon slots and the wreck's name. Export rewrites one of those only while the file still holds the value the last export wrote. A field holding anything else was changed by hand and stays, and a field you deleted stays deleted. A change written in from Unit tweaks counts as a change by hand. A field the build has started writing is added, and one it has stopped writing is taken out. Every other field is written on the first export and then left alone. Comments and the order of the file are kept. The export drawer lists each field it changed and each one it kept.
- While the workshop has an edit in place on the unit that you have not accepted or undone, export leaves the unit definition alone and says so. Undo puts the workshop's backup back over the file, which would throw the export away.
- The script is replaced while it is still exactly the script the last export wrote. Once you change it, export leaves it alone.
- The texture is written once and then left alone, unless you tick Replace textures already there.
Export only updates a unit definition it has a record of writing into that folder. Each folder keeps its own record, so a unit exported into two games stays up to date in both. A file of the same name that coilbox did not write, such as one of the game's own units, is left alone. Only the models are overwritten every time, because they are the files the builder alone owns.
The one exception is coilbox's own scratch game, below, which is a throwaway and is always rewritten in full.
Export writes nothing about the game around the unit. It adds the unit to no other unit's buildoptions, and writes no side, category, armour class or yardmap. A weapon's own definition belongs to the game or to the workshop project it came from. Making the game use the unit covers those, in the workshop.
The wreck
A built unit leaves a wreck when it dies. The definition names it as corpse = "<unit>_dead", and export writes its model and its feature definition.
The wreck is shaped like the Wreck pose preset when that is applied, and like the unit at rest when it is not. A wreck runs no script, so the pose is baked into its model. It holds half the unit's metal cost and half its health, rounded down, which is what Splinter Faction gives its own wrecks. It blocks the ground where a building stood, but not where a unit drove.
Splinter Faction's death gadget drops a second wreck of its own when heat kills a unit, named by customparams.corpse. The builder writes that as an empty name, so a built unit there leaves only the one wreck. A heat kill's wreck then holds the feature file's half of the metal, not the gadget's full amount.
The Break apart preset writes how the unit comes apart when it dies. It breaks the unit along its connections, and along the piece tree for a unit with none. The engine hands Killed the damage taken lately and the unit's health, and the script works out recentDamage / maxHealth. A hit up to the light threshold (25% by default) throws off the weakest third of the unit's branches whole, with smoke. A hit up to the medium threshold (50%) cuts one level deeper, throws two thirds, and adds fire. Anything heavier cuts at every connection, throws every part with smoke, fire and an explosion on impact, and shatters the body. The weakest group is the smallest. How much breaks off scales those shares. The engine draws debris in the model's rest pose, so a thrown part does not keep a pose an animation left it in. Every grade returns wreck level 1, because the export writes one wreck and no heap, and a higher level would leave none.
The wreck's model is rewritten every export. Its feature file follows the script's rule: it is replaced while it is still what the last export wrote, and left alone once you edit it. The export drawer lists both, and says when it kept the feature file.
The engine's own gamedata/featuredefs.lua reads every file under features/, folders included. A game that replaces that file, or never reads features/, will not load the wreck. None of the six installed games checked when this was built does that. Test in game writes the wreck too, so a test match drops the same one.
The build picture
A game's build menu shows a small picture of each unit. With no buildpic in the definition the engine looks for unitpics/<unit>.dds, then .png, .pcx and .bmp, and draws a blue square if it finds none. So the builder writes unitpics/<unit>.png and adds no key.
Build picture in the toolbar opens a drawer with a preview of the frame, a camera angle, a transparent or coloured background and a size in pixels. The size starts at 320, the size of the overview thumbnail. Take picture stores it on the unit, and every export after that writes it.
The picture is write once, like the script. If unitpics/<unit>.png is there already and coilbox did not write it, or you replaced it with a painted one, export leaves it and says so. Coilbox tells the two apart by the digest it recorded when it last wrote the file.
Export never takes a new picture on its own. When the unit changes after the picture was taken, the toolbar button shows a dot and the drawer offers Update picture. The drawer also reads the game's unitpics folder and says when most of its pictures are another size, or another format.
Where the unit's name goes
Nearly every game reads a unit's name and its one-line description out of the unit definition, as name and description, and that is where export puts them.
Beyond All Reason does not. It builds every unit's label from Spring.I18N('units.names.' .. unitDefName), keeps the answers in language/en/units.json, and never looks at the definition. A unit named in its definition there shows up in game as units.names.mytank.
So export opens that one file before it writes anything. A game that names its units in it gets a definition with no name and no description, and the words go to language/en/coilbox.json beside it instead. That is a file of coilbox's own, holding the names of the units coilbox put in the folder and nothing else. Beyond All Reason's modules/i18n/i18n.lua reads every *.json under language/<code>/ and merges them, so a second file is read exactly as the first is.
The game's own units.json is never written to. Export reads it to answer one question. A name the game already declares is the game's, so a unit whose internal name the game already uses gets no name written for it at all.
The drawer says which of the two is about to happen before you press the button, because the wrong answer looks perfectly correct in coilbox and is wrong only in the game.
Renaming a unit you have already exported
Every file above is named after the unit, so renaming the unit and exporting again writes a second set rather than moving the first. The old files stay where they are and the game reads them as another unit, which it will happily put on a build menu and spawn. If you renamed the model too, the old unit is broken as well: the engine drops a definition whose objectname no longer resolves, so it is in the game folder but never in the game.
Export does not delete anything. The game folder is yours and two units under two names is occasionally what somebody wanted. What it does is tell you: the export drawer lists what is still there under the old name, with a button that removes it.
The button only offers files coilbox can prove it wrote, by checking each one against the digest recorded when it was written. A file you edited after exporting, and a file the game shipped under the same name, are both named and both left where they are. Delete those yourself if you want them gone.
In the workshop, a unit left behind this way is marked stale in the unit list, so a game with hundreds of units still shows you which one you did not mean to keep.
Its name in language/<code>/coilbox.json is not removed. That unit is still in the game until you clear it, and a leftover with a name reads better than a leftover called units.names.mytank. Exporting under the new name adds a key beside it rather than replacing one.
The collision volume
The collision volume is the shape the engine hits, clicks and shoots at. It is not the model: a unit is selected, shot and blocked by its volume, whatever its geometry looks like.
A unit definition that names no volume gets the engine's own, a sphere around the whole model, which for anything longer than it is wide is a much bigger click target than the unit looks. So export always writes one. By default it is the unit's own bounding box, which is the tighter of the two and needs no decision from you.
The Collision tab beside Pieces and Animation shows what will be written, and lets you replace it. Pick a shape, then set its size and where it sits:
- Size is the volume's full width on each axis, not its radius. The engine halves it.
- Offset is measured from the unit's aim point, which most units leave on the middle of their bounding box, so zero is centred on the unit.
Changing anything takes the volume over, and it is then saved with the unit. Use the bounding box hands it back, and the derived volume follows the geometry again as you build.
You do not have to type any of it. While the Collision tab is open the viewport's move and scale handles are on the volume rather than on a piece, so you can drag it to size and watch the numbers follow. There is no rotate handle, because a volume has no rotation: the engine measures it along the model's own axes. The per-piece fields further down the panel can borrow those handles for one piece's own box.
Two shapes cannot be stretched, and the engine says so rather than the panel: a sphere takes the largest of the three sizes for every axis, and a cylinder takes the larger of the two across it for both. The viewport draws what the engine will end up with rather than what was typed, so a sphere dragged out on one axis comes back round.
The box button in the viewport's camera group draws the volume as an orange wireframe, over the model, so you can keep an eye on it while building rather than only while setting it.
Use each piece instead
A unit can be treated piece by piece rather than as one shape, and there are two switches for it because the engine asks the question twice:
- Shoot at each piece writes
usepiececollisionvolumes = true. A shot is then tested against a box around every piece, so it can pass between a walker's legs or under a gantry rather than stopping at the shape above. - Click on each piece writes
usepieceselectionvolumes = true. The click target is then the pieces rather than the shape above. That is what a gantry or a spindly walker wants, because otherwise it is selectable from the empty air it encloses.
Neither switch turns the other on. The engine reads them in two functions, ParseCollisionVolume and ParseSelectionVolume, over the same boxes, and a unit shot at piece by piece while staying an easy click is a real combination rather than a mistake. Turning on the shooting one alone is what most units want, which is why the shape above stays the click target unless you say otherwise.
Turn either switch on and the viewport draws the boxes the engine will build, in yellow over the model. They are yellow rather than orange so they read apart from the unit's own volume, which is drawn at the same time and usually has them all inside it.
Those boxes start as a reading, because nothing declares them. No .s3o piece carries a collision volume and no unit definition can name one: the engine measures a box around each piece's own vertices as it loads the model. The only way to change one is Spring.SetUnitPieceCollisionVolumeData on a unit that is already alive, which makes it a unit script's job.
Change one piece's box at the bottom of the panel does it anyway. Pick a piece, and it opens on the box the engine measured for it. Change a number and that piece is yours: a different shape, a different size, a different place, or out of the hit test entirely so nothing stops there.
Selecting a piece while this panel is open moves the viewport's move and size handles onto that piece's box and draws it wide so it can be picked out of the crowd. There is one set of handles, so the unit's volume gives them up and dims while a piece has them. Deselect to put them back. A piece nothing hits draws no box, so the handles stay on the volume.
Anything set here is written on export, as Lua, to scripts/coilbox/<unit>_collision.lua inside the game you export to. That file is coilbox's own and is rewritten every time, which is the whole reason it is a file of its own: scripts/<unit>.lua beside it, the animation script from The script behind the presets, is left alone once you edit it, so collision code inside it would be frozen at whatever it held when you took it over. The generated animation script pulls the collision file in with one include line. A script you took over before setting any of this has no such line and an export will never add one, so the panel says which line to add. Show the file this writes prints the Lua the next export would produce, so it can be read without going and finding it in the game folder.
The volume above still matters with either switch on. It is the sphere an explosion measures to decide whether the unit was caught at all. And with only the shooting switch on it is still the shape you click, because ParseSelectionVolume reads no shape of its own and falls back to the collisionvolume keys.
The aim point
The aim point is the one point on the unit that another unit shoots at. A weapon does not fire at a model, it fires at a position, and the engine uses that same position as the unit's middle for range checks and for leading a moving target.
Left alone it is the middle of the model's bounding box. That is the wrong point whenever a long outlying piece drags the box off the body: a crane arm, an aircraft tail, a raised dish. The point ends up in the air beside the unit, or down in its legs, so shots aimed at it miss what a player is looking at.
The Aim tab beside Collision sets it. It opens on the measured middle, and typing anything takes it over. Use the bounding box centre hands it back, and it follows the geometry again as you build. The crosshair button in the viewport's camera group draws the point as a red dot, and opening the tab draws it whether or not that button is on.
You do not have to type it either. While the tab is open the viewport's move handles are on the point, so it can be dragged onto the body and the numbers follow. Move is all it gets: a point has no size to scale and nothing to rotate, so the other two tools stand down.
Two other numbers are measured from this point rather than from the model's origin, so both move with it, and the builder keeps both right:
- The collision sphere. The s3o header's radius is that sphere's radius and it is centred on the header's mid, so the radius is re-measured from wherever you put the point. Without that a unit gets a sphere that no longer covers it.
- The collision volume's offsets.
CollisionVolume::GetWorldSpacePosadds them to the unit'smidPos, which is this point. Move the point and the volume would slide off the geometry with it, so the offsets absorb the move: the shape in the viewport stays where you put it and only the numbers in the Collision tab change.
This is not which piece a weapon fires from. That is AimFromWeapon and QueryWeapon in the unit's script, which the builder writes for each weapon. See Units that fight.
The header's mid is the only lever a model file has. CUnit::PreInit sets both the middle and the aim point from it with SetMidAndAimPos(model->relMidPos, model->relMidPos, true), so setting one sets the other. Prising them apart needs Spring.SetUnitMidAndAimPos from a game's own Lua, which an exported unit cannot carry.
Test in game
Test in game is the shortest honest route from a unit in the builder to a unit on a map. Everything else is a guess until the engine draws it.
Pick a game to build on and a map. Coilbox writes a scratch game of its own, coilbox-lego-test.sdd, into the content root's games/ folder. It depends on the game you picked, which supplies the sides, the rules and everything else, and the scratch archive adds only your unit. Your install is not touched, and deleting that one folder undoes everything the flow has ever written.
Coilbox then rescans, so the engine picks the scratch game up, and Launch with it as start unit starts a one-player skirmish on the map you chose.
A unit with legs, wheels or tracks, or a walk or roll preset, that has no movement class of its own is given one from the game you test in. It gets the first class the Movement section would offer it, with the speed and turn rate taken from that game's units, so a walker built with no game still walks. A class you picked is kept. The real export is not changed, and the builder's problems list warns that a unit like this exports as a building.
Once you are on the map, press Enter and type:
/cheat
/give <unit>
Cheats have to be on before /give does anything. You rarely need it, because the scratch game's gadget gives you one of the unit a second in. It goes on the nearest clear ground to your start position, so it does not land inside a commander the game puts there.
A game missing LuaRules/draw.lua or LuaRules/main.lua runs no gadgets at all, because the engine drops LuaRules without saying so when either file is missing. Empty Mod lacks draw.lua. Coilbox asks unitsync which of the two the game has, and the scratch game supplies a missing one that starts the engine's gadget handler.
You need an engine, at least one game and at least one map installed. The drawer says which of those is missing rather than failing at launch.
After an edit you quit and test again. What the engine reloads in a running game explains why only a script could be swapped into a running game.
Check it loads
Check it loads, in the same drawer, plays the same scratch game with no window. It spawns the unit, runs it for 15 seconds of game time, the same stretch the animation preview plays, and lists what the engine said about it: a script that threw or did not compile, a piece the script names and the model lacks, a model file that is missing, a definition that did not parse, and a texture the model names that is not there. When the game itself fails to start with the unit in it, the drawer shows the engine's reason. A unit with a movement class is also ordered to drive towards a corner of the map, and the drawer says how far it got and on which class. One that does not move at all is listed as a problem.
It proves the unit loads and runs. It does not show how it looks.
Most errors in a headless log are not about your unit. A healthy Splinter Faction run logs 53, from widgets that need a screen and the game's own definitions, so the drawer counts those and leaves them in the log rather than listing them. Show me the engine log opens the whole thing.
The check needs spring-headless and the engine's base content, and the drawer says which is missing. It runs in a folder of its own under coilbox's cache, so nothing is written to your engine or your settings. The first check takes longer than the rest: on a Mac it took 42 seconds and then 11, because the engine scans every archive once and Splinter Faction builds files of its own on a first run.
Launch sandbox with targets
Launch sandbox with targets starts a skirmish that is set up for trying the unit out. No cheats are needed.
- Your unit is at your start position, on the map's first start spot.
- Beside it is the game's own builder, the start unit of the game's first side. Your unit is on its build menu.
- Three copies of your unit stand 320 elmos away, towards the map's second start spot, on a team nobody plays. They hold fire and hold position. One that dies is replaced where it stood, so the match does not end when you have shot them all.
- The builder holds fire too, so its own weapons leave the targets to your unit. Change its fire state in game if you want it to fight.
- You start with a full bank, so the builder can build your unit straight away.
It runs on coilbox's mission runtime, the way the workshop's "Start with this unit on the map" does. The scratch game carries the runtime, a generated mission, a gadget that holds the targets still, and download/coilbox_sandbox.tdf, which puts your unit on the builder's menu. The engine reads that file while it loads the game's units, so nothing of the game's is changed or copied. All of it is in the same scratch folder, so deleting the folder still undoes everything.
Splinter Faction 0.1.89 has not taken the runtime's start guard (the adoption contract), so a minute into the match it adds a commander to each team as well. The targets' one holds fire like the rest.
A map with no start positions has nowhere to put the targets, and the drawer says so. The builder can only place your unit where its definition allows. A unit that cannot move is written with a maxslope of 20, so it cannot be built on steeper ground than that.
The scratch game does not carry your unit's weapons yet, so it cannot fire at the targets (issue #4264).
Reload into the sandbox
Reload into the sandbox puts your latest change into the sandbox that is already running, so you keep the map, the targets and the time you spent getting there. It shows only while a game started with Launch sandbox with targets is running, and says it is waiting until the engine has started.
- A changed script reloads. Every copy of your unit in the game, yours and the targets, starts running the new script straight away. Nothing has to be respawned.
- A texture that changed but kept its file name reloads, and every copy of your unit shows it straight away. A texture under a file name the game did not start with needs a relaunch.
- A changed unit definition or model needs a relaunch. The drawer says which one changed and offers Relaunch, which closes the game and starts a new sandbox.
- Renaming the unit needs a relaunch too. A running game only sees files that were there when it started.
When the model changed as well, the script and the texture wait for the relaunch, because a new script on the old model can move pieces the model does not have.
Coilbox reaches the running game through the engine's autohost interface, and the sandbox gadget reloads only the game's unit script framework. Reloading every gadget would restart the game's own as well, and Splinter Faction's then kills the targets' team because it has no commander. What the engine reloads in a running game has the detail.
Making the game use the unit
Straight out of export, nothing lists the unit in any unit's buildoptions, so nothing can build it. /cheat and /give is the only way to get one onto a map.
To put the exported loadouts of a chassis on a factory's build menu, open Compare loadouts, pick a builder under Build menu, tick the loadouts and press Add. This records an add for each unit in the game's newest workshop project, in upgrade chain order, and starts a project for the game if it has none. Remove takes them off again. A loadout that has not been exported is listed and not offered.
Built by
Built by, in the Animation panel, lists the builders of the unit's own game that build this unit. Pick one under Add a builder. This changes no file of the game. When coilbox launches the unit through a game it generates, such as Test in game, it writes download/coilbox_build_list.tdf into that game. The engine's base content reads every file under download/ after all the unit files have loaded and before the game's unitdefs_post.lua runs. It adds the unit to the end of each builder's buildoptions. The game's own post processing still runs, because nothing replaces it.
Some games load their units with their own gamedata/unitdefs.lua and never read download/. Beyond All Reason and Zero-K do that. Spring 1944 replaces download_builds.lua with its own. Coilbox asks the game which kind it is before it launches. If the game will not read the list, the Test drawer says so under the launch buttons, and the unit can still be spawned with /cheat and /give. A campaign mission that launches with the unit says so on its briefing (Units from the unit builder). A builder that is not in the game being tested is left off and named there too.
Test in game starts you as the unit itself, so to see the list, use Launch sandbox with targets. It starts you on the game's own start unit, or give yourself a factory from the list.
In a conquest or a warpath
A conquest or a warpath run can begin with units from the builder, the same way a campaign carries them. On the setup screen, under Units from the builder, press Add unit and pick from your saved units. The field only shows when you have saved a unit.
Each unit is copied when the conquest or run begins, so editing it in the builder afterwards changes nothing. A conquest keeps its copies under conquest/units/<galaxy id>/ in coilbox's data folder, and a run under runlite/units/<run id>/. Abandoning the conquest, starting it again or deleting the run removes them, and the game coilbox wrote for them.
Every battle launches through a game coilbox writes at launch, coilbox-lego-conquest-<galaxy id>.sdd or coilbox-lego-run-<run id>.sdd. It depends on the exact game the conquest or run resolved for that battle, so a move to a newer version of the game rewrites it. A location that plays a scenario plays it on top of the same game. What was left out shows under the launch button, as it does in the Test drawer.
In a warpath the units join the build tree under their builders before the run is generated. So a reward can offer one, and the unit limit locks it until a reward unlocks it or its builder, as for any other unit that builder builds.
A shared challenge code does not carry the units. Somebody who imports it plays on the game's own units. Because the rewards of a warpath are drawn from its build tree, a run with builder units can offer different rewards from a run of the same code without them.
Movement
A movement class names an entry in the game's own move definitions, and the engine drops a unit that can move but names a class that does not resolve. So the builder never writes a class it made up. Movement, in the Animation panel, offers the classes of the unit's own game, read out of that game's gamedata/movedefs.lua.
For now a unit belongs to a game only when it was opened from one. A unit built from parts has none, so Movement says so, offers nothing and the unit is exported static (issue #3257). Give it a movement class in Unit tweaks after export instead, as described below.
The build decides which classes fit. A piece in the Wheel role makes a vehicle, and a piece in a leg role makes a walker. The engine decides which kind a class is, from its speedModClass or else from its name, and the picker uses the same rule. When the game has no class of the build's kind, the picker offers the nearest kind it does have and labels each class with the kind it stands in for. Splinter Faction calls its walker classes WALKERTANK, so to the engine they are vehicles, and a walker there is offered the vehicle classes marked "no walker class". A unit with neither wheels nor legs is offered every class and starts as Does not move.
Picking a class fills in the speed, turn rate, reverse speed, acceleration and brake rate with the median of the game's own units on that class, or on classes of the same kind when none of its units use that one. Each field says where its number came from. Type over any of them to set your own. A reverse speed is only suggested from units that can reverse, and a brake rate only from units that state one, because the engine brakes a unit that states none at its acceleration.
With a class and a speed the definition is written with canmove = true, movementclass and speed, plus turnrate, rSpeed, acceleration and brakeRate when they are set. Without one it is written static, as canmove = false.
When the game's movedefs.lua cannot be read, the picker falls back on the classes the game's units use, and says it has not narrowed them.
Hovercraft, aircraft and ships
The roles and presets were made for units that walk or roll. To the engine a hovercraft and a ship are ground units with a different movement class, so most of what works for a tank works for them. An aircraft is not a ground unit, and the builder cannot export one yet.
A unit with no wheels and no legs is offered every movement class its game has, so you can pick a hover or a ship class under Movement. A unit built from parts has no game yet, so it gets no classes at all (issue #3257).
Each of the three has a body plan to start from, built from the roles and presets below. See Hovercraft, ships and aircraft.
A hovercraft:
- Works today. The engine sends it
StartMovingandStopMovinglike a tank, so Driving along a path steers it as a game would. Hover and bob on the Body piece bobs and rocks the hull for the unit's whole life. Wake while moving emits a wake from the wake bone while it moves, which the engine draws fainter for a hovercraft than a ship. Idle sway, turrets and weapons work as on any unit. - Does not work. It does not lean into turns (issue #3359).
An aircraft:
- Works today. Hover and bob suits a gunship holding position, but it keeps running after the aircraft lands. Landing gear stows on take off and lowers on landing, and the Take off and land scenario plays both. Give the gear pieces the Landing gear role, with each joint at the hinge. They turn about x, up to Stowed angle over Stowing time, which start at 105 degrees and 2.3 seconds, the legs of Balanced Annihilation's Dragonfly. The aircraft plan has no gear bones, so add them. Turrets and weapons work. The engine sends
StartMovingwhen the aircraft's speed rises from zero andStopMovingwhen it falls to zero. - Does not work. Movement offers only ground classes, so export writes a static unit or a ground unit (issue #4370). There is no rotor role or spin (issue #3359). Driving along a path is for ground units only. Doors swings open and shut for the whole flight, because the engine switches an aircraft on as it takes off and off once it has landed. Use Landing gear instead.
- By hand. In Unit tweaks, set
canFly,canMove,speedandcruiseAltitude, and clearmovementClass. AddhoverAttackfor a gunship rather than a plane that makes strafing runs. The engine banks and pitches the whole aircraft itself, so the script should not. Take ownership of the script for rotors:SpinonStartMovingandStopSpinonStopMoving. A gunship is also sentMoveRatewith 0, 1 or 2 as it speeds up, which a script can use to tilt rotors or wings.FallingandLandedare not for aircraft: they are for a unit dropped from a transport.
A ship:
- Works today. The engine sends it
StartMovingandStopMovinglike a tank, so Driving along a path, Idle sway, turrets and weapons all work. Rudder follows turns swings the rudder with the ship's turning, up to its Largest angle slider. It reads the heading every 6 frames, because the engine never sends a Lua scriptChangeHeadingfor a turn it can make, and gives 0.5 degrees of rudder for each degree a second the ship turns. Play it under Driving along a path. Wake while moving emits a wake from each wake point every Time between wakes, which starts at 0.12 seconds, Balanced Annihilation's interval at full speed. It emits a reverse wake when the engine says the ship is backing up. The engine drops a wake emitted on land, so the script does not check. Hover and bob with a small bob reads as a ship rolling on the swell. The sea under Ground shows how the hull sits in the water. - Does not work. The preview tells the script it is on land even on the sea (issue #4367).
- By hand. A ship floats with the model's origin at sea level unless its definition sets
waterline, the depth in elmos it sits below the surface. The builder does not write it, so set it in Unit tweaks. A ship class inmovedefs.luacan override it withoverrideUnitWaterline.
Fit to the game
Below Movement, Fit to the game compares the unit with the game it belongs to and changes nothing. It has three rows:
- Armour class. The engine puts a unit in the class whose list in
armordefs.luanames it, and indefaultotherwise. A built unit is in no list, so the row warns when the game has classes and this unit is in none. - Category. A unit with no category cannot be targeted by any weapon, because the engine drops a target whose category does not overlap the weapon's
onlyTargetCategory. The row warns on none, and on a category no unit in the game uses. It lists the categories of the game's similar units, meaning those on the same movement class, or the static ones for a unit that does not move. - Movement class. The row warns when the unit moves and names no class, or names one the game does not declare. A flier is not checked.
Before the first export the rows read the definition the builder would write. After the unit is exported into the game and read back, they read the game's own entry, because that file is where a built unit's stats live. A warning on armour class or category then links to the unit in Unit tweaks, where both are changed. Like Movement, it needs the unit to have a game, so for now it checks only a unit opened from one.
The decisions the builder cannot make are made in Unit tweaks, under workshop in the sidebar. Pick the game you exported into and your unit is in the list, alongside the game's own:
- Give it a movement class, for a unit built from parts. The field is a picker, and what it offers is the classes this game's units already move on. Turn Can move on beside it. The page says so if only one of the two is set, because either half on its own is wrong.
- Put it on a builder's menu. Open the factory or the commander that should build it and add it to the roster. That is the answer to "which builder gains it as an option", and it is the same editor you would use to change any of the game's own build menus.
- Change any other number. Categories, armour class, and any number the builder set, such as health or cost. The unit edits exactly like a unit the game shipped.
The unit is in that list because units/<unit>.lua is a file in the game and the engine reads it like any other. What export adds is a note of where it wrote, so the workshop can mark the unit as yours and say which model it came out of, rather than leaving you to spot it among the game's own. A unit exported into several games is marked in each of them. Export the same unit again and it is still one unit, not two. Nothing is imported and there is no button to press.
If the unit is not in the list, unitsync has not re-read the game yet. The workshop shows the definition export wrote until it does.
A change in Unit tweaks stays in the workshop project until you write it into the game with Write changes into the game. See Edit the game's own files. From then on export treats each field it changed as set by hand and stops updating it. Until you accept or undo that write, export leaves the unit definition alone.
The engine load checklist
Result: all five proved. The check is: export a unit into a .sdd working copy or use Test in game, get it onto a map with /cheat and /give, and confirm all five of:
- The model renders at all. Proved.
- Its orientation and handedness are right, so it faces the way it did in the builder and is not mirrored. Proved.
- Textures land on the right geometry. Proved, after fixing issue #4164 and issue #4165.
- The selection volume is sane, so clicking the unit selects it and the volume is neither a speck nor the size of the map. Proved.
- The infolog has no Lua error from the unit script. Proved.
Three of them no longer need a machine that can draw. spring-headless runs a full simulation with no OpenGL context, and the engine's Lua tells you where it thinks every piece is, how big the unit is, and whether the unit script bound. An L-shaped probe unit, exported through the normal path and spawned twice at different facings, settled them:
- Handedness. Spring derives a piece's emit position from its first two vertices, so
Spring.GetUnitPiecePosDirreturns a point predictable from the file alone. Every piece landed where the file says, to four decimal places, at both facings. The transform from model space to world space is a rotation, determinant +1, not a reflection. Nothing mirrors the model, including a piece scaled-1, 1, 1. - Orientation. Model
+zis the unit's front, model+yis up, and model+xis the unit's left. The builder marks this on the ground: see Which way it faces. - The selection volume.
Spring.GetUnitRadiusandGetUnitHeightreturn the s3o header values exactly, and the engine's default collision volume is the smallest sphere containing the geometry. Sane, but a sphere is a generous click target for a long unit, so an export now writes a volume of its own: see The collision volume. - The infolog. Nothing in it names the unit, its model or its script.
Spring.UnitScript.GetScriptEnvreturns an environment carrying exactly the call-ins the generated script declares, so the script loaded and bound rather than merely failing quietly.
The other two need pixels, so issue #3316 ran a windowed spring on Splinter Faction 0.1.89. Its probe unit has three parts and is asymmetric on every axis: a hull from the red column of the atlas, a tower from the white and blue-grey column on the model's +x side at the back, and a turned cube from the stone column hung off the hull at the front on -x. The builder's own functions made it, from newProject through buildS3o to the plugin's ExportModel and coilbox_s3o::write, into the same scratch game Test in game writes. A gadget gave it with /cheat and /give, put the camera at three fixed points in the unit's model space, and took a screenshot with screenshot png from each. A throwaway page drew the builder's own scene, syncScene with partMaterial, from the same points.
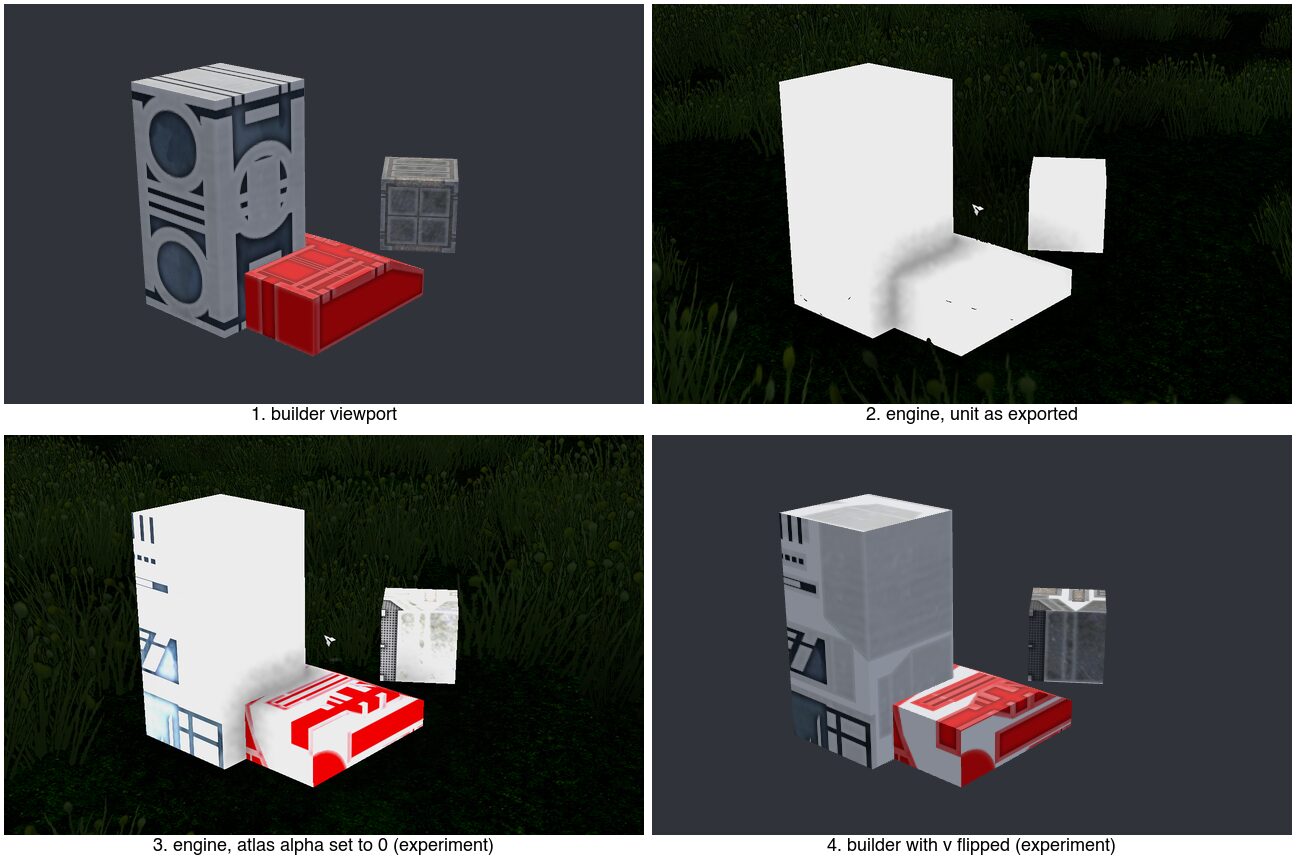
- The model renders. All three pieces drew, in the places and at the sizes the builder shows, from all three points. The engine named the pieces
base, hull, nose, tower.bun run lego:reads3oon the same file found the hierarchy and offsets as built, no triangle wound against its normal, and u from 0.1199 to 0.9990 and v from 0.3690 to 0.8866. - The texture failed twice at first. The engine drew the whole unit in team colour, which was white here (panel 2). The pack's
atlas.pnghas no alpha channel, and the engine reads a missing alpha as 1, which is all team colour: issue #4164. With the alpha set to 0 the texture shows (panel 3), but every face samples the vertically mirrored part of its column. The builder with v flipped matches the engine from all three points (panel 4). The pack's UVs count v from the bottom of the image, as an.objdoes, and the engine counts it from the top: issue #4165. u is right, so every piece stays in its own colour. - The texture name. The engine finds the
coilbox_-prefixed atlas inunittextures/by the name in the.s3oheader.UnitDefs[id].model.textures.tex1readcoilbox_atlas.png, the infolog has no "could not load primary texture" warning, and replacing only that file changed what the engine drew. - The texture after the fixes. An export now writes an atlas with no alpha channel into
unittextures/with an alpha of 0, and writes a part's v as 1 - v. The bundled atlas itself stays opaque, because the builder draws from it and an alpha of 0 there drew every part black. The same probe, run the same way with the atlas written by the export's own code, draws every face as the builder does from all three points, with no team colour (panel 3 below). The builder's own view of the probe is pixel for pixel what it was before the change. - An imported unit's texture. Issue #4174 ran the same check on two units opened from Splinter Faction: the droppod
scavs/scavbeacondroppod.s3o, painted with a PNG, and the beaconscavs/scavbeacon.s3o, painted with a DDS. The builder drew the beacon as the engine does, and the droppod with the mirror image of its texture on every face. The engine reads v = 0 as the top row of every texture except a.dds, which it flips on load. The builder now samples them the same way, and so does a.3do's sheet, which is a PNG. - Lighting is not part of this check. The engine draws the parts much paler than the builder does, the stone cube nearly white. Which pixels are sampled is right. Why they come out paler is not known yet: issue #4175.
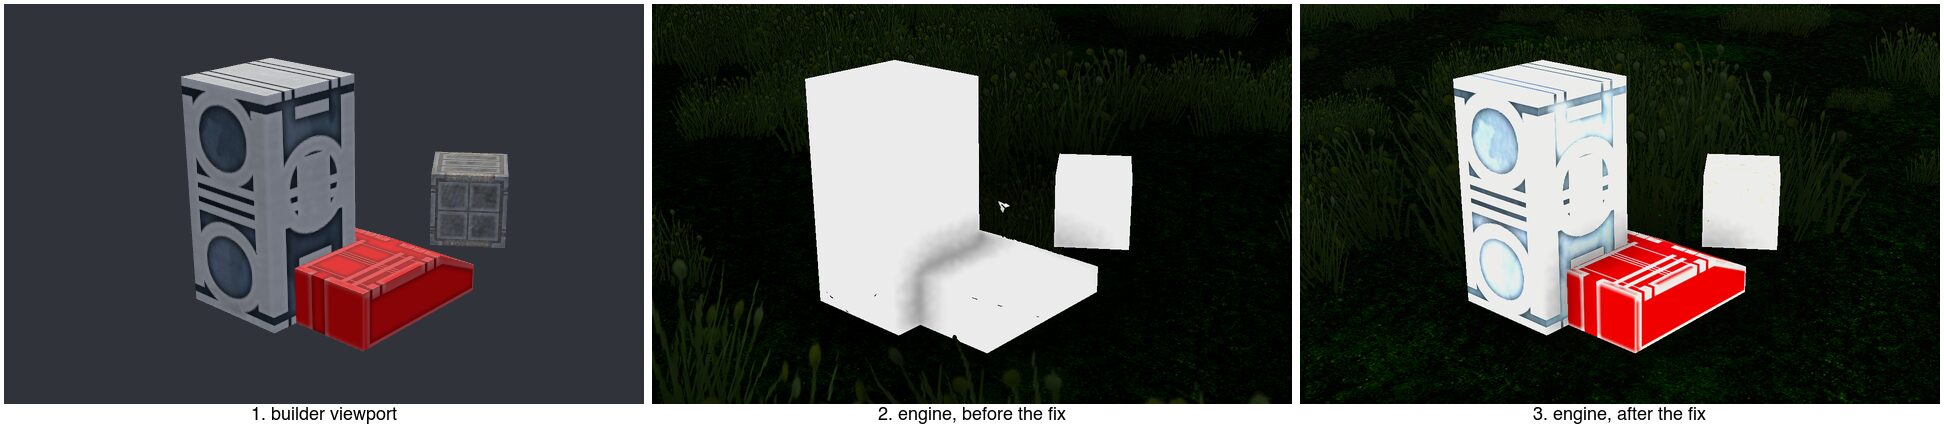
Issue #4166 ran the Blender check that issue #563 closed without a result, on the probe unit with Blender 5.2.2 and S3O Kit 0.3.2. The hierarchy, offsets, header values and orientation match the file. The texture does not show: S3O Kit loads no material when the second texture name is empty, which the builder writes (issue #4246). A PNG atlas also draws mirrored vertically there, because S3O Kit takes v as the file gives it and Blender counts v from the bottom of an image, while the engine counts it from the top for a PNG. The file is right for the engine. For Blender, use the .glb or .obj export in the blender folder, or flip v on the image.
Two things about the windowed run itself. A fresh write directory makes Splinter Faction's gui_initial_settings widget apply its settings and reload the engine, and the one windowed reload tried here aborted in AppKit before the game started. A write directory whose springsettings.cfg already has SFInitialSettingsVersion set runs straight through. The window was on screen for every shot, so whether screenshot works from a hidden window is still unchecked.
The same run found the footprint was wrong: it was derived from the collision radius, so a unit longer than it is wide claimed far more ground than it stood on. Fixed in issue #679: the footprint now measures x and z off the model's own bounding box, each axis rounded up to its own step. Reverified headless on an asymmetric probe (48 by 6 elmos): the exported definition wrote footprintx=3 footprintz=1, and UnitDefs[id].xsize/zsize in a running engine read back 6 and 2, a rectangle rather than the square the old code would have claimed.
Record any further outcome here, and on issue #565, rather than remembering it.
Parts packs
The bundled pack is derived from KaiserJ's original v2 lego parts, released on the Spring forums with "do whatever the heck you'd like with these". Several packs can be installed at once and they share one atlas, so parts from all of them can sit in the same unit. A pack picker appears once there is more than one, in the strip's parts filters and at the top of the Lego Parts page. The format, where extension packs go and how to build one are in the parts pack guide.
A unit records the pack it was built against. Opening one whose pack is not installed still works: the pieces keep their names, hierarchy and transforms, and any piece whose part is missing draws nothing and is counted in the warnings above the viewport.